Customizable webhooks
On this page we show you how to use the features that allow you to customize your webhooks by adding filters, custom headers and custom payloads. These features reduce the amount of code you need to write in your webhook apps.
Creating a webhookLink copied!
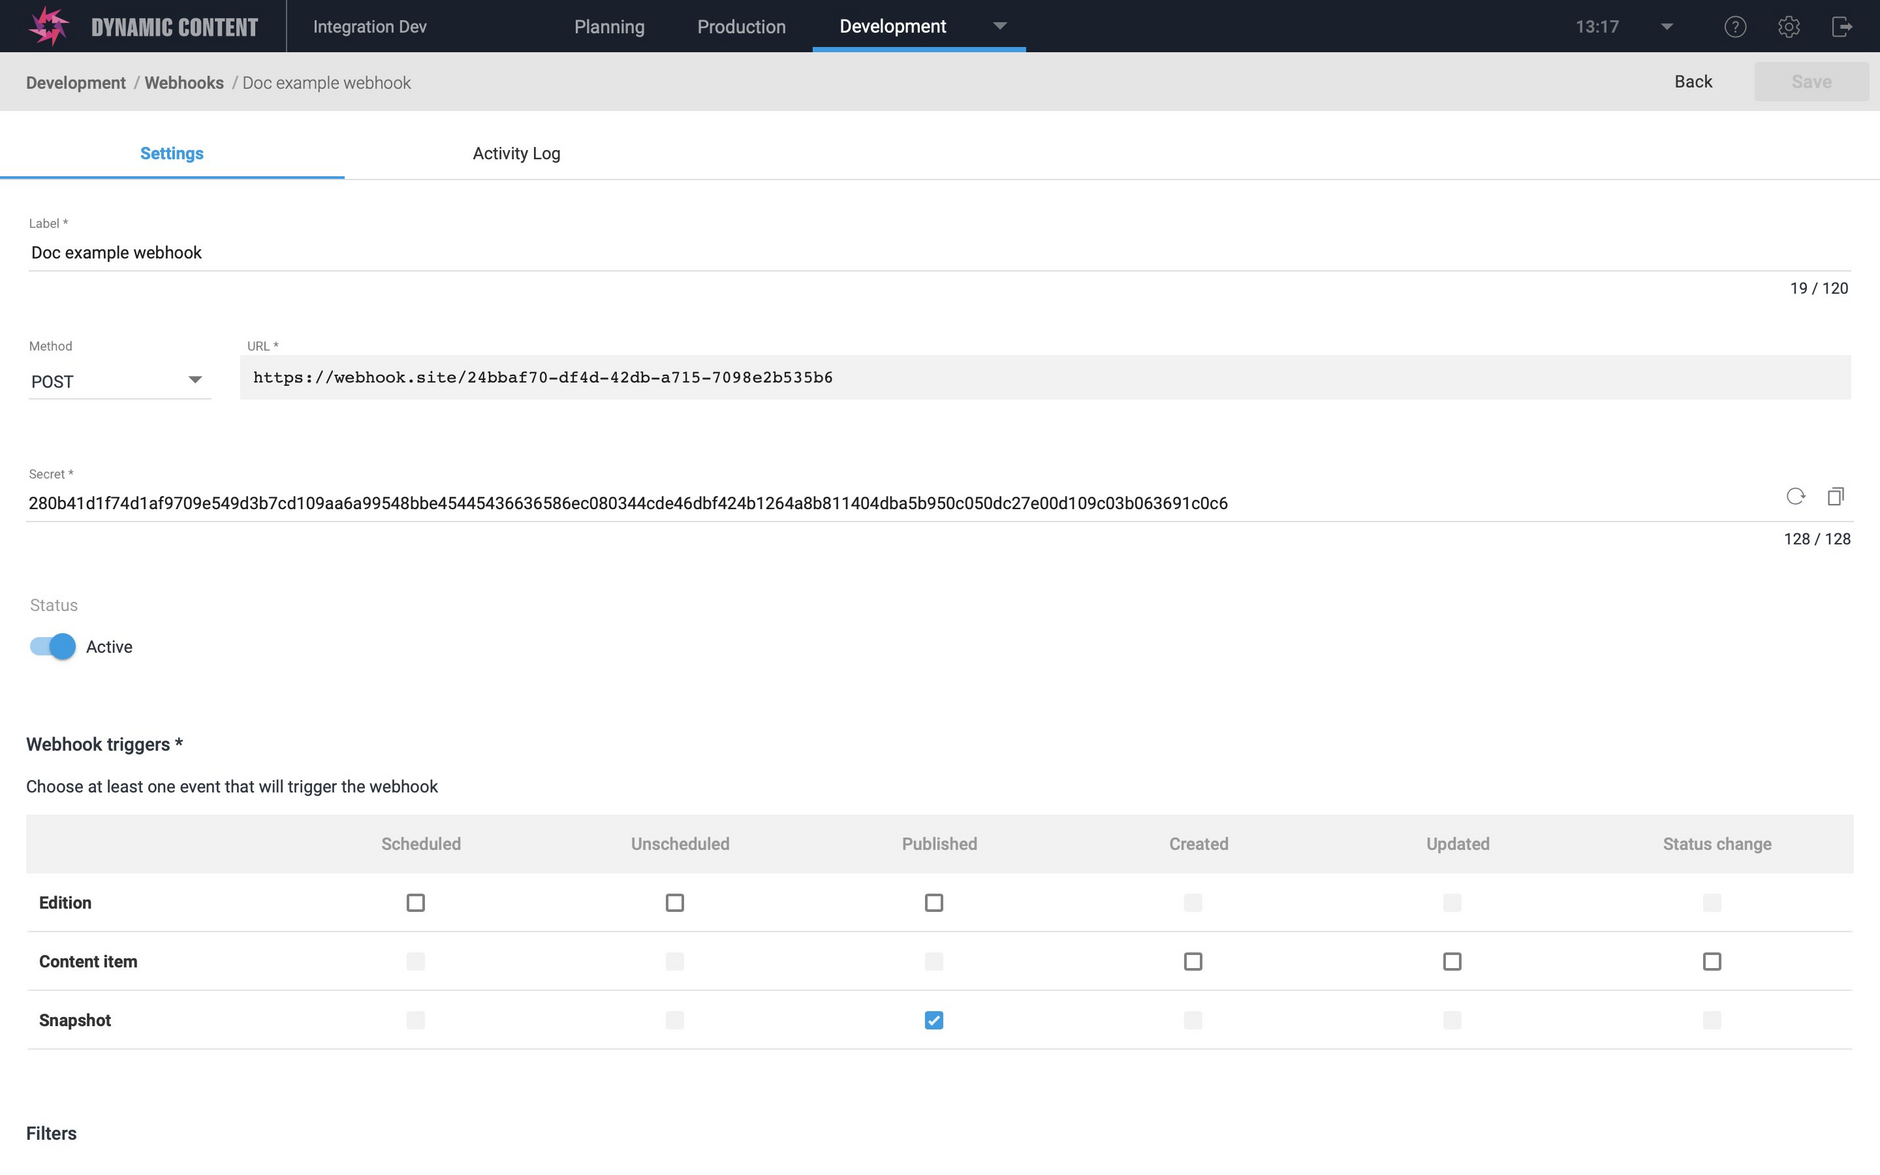
When creating a webhook, you specify:
- The label. This is just used to make it easier to identify the webhook in the list
- The webhook triggers that it wants to subscribe to
- The URL that will be notified when one of these events occurs.
- The method that will be used for the webhook request. By default this is POST, but you can also choose PUT, PATCH or DELETE. See the HTTP request methods section for more details.
The available webhook events will be shown in the "Webhook triggers" section. Choosing which event(s) will trigger your webhook depends on the the user actions you are interested in. In the "Doc example" webhook, requests will be sent when a content item is published.
FiltersLink copied!
By setting filters you can choose to trigger the webhook event only when one or more specified conditions are met. For example you may want a webhook to be triggered when content of a particular type is published.
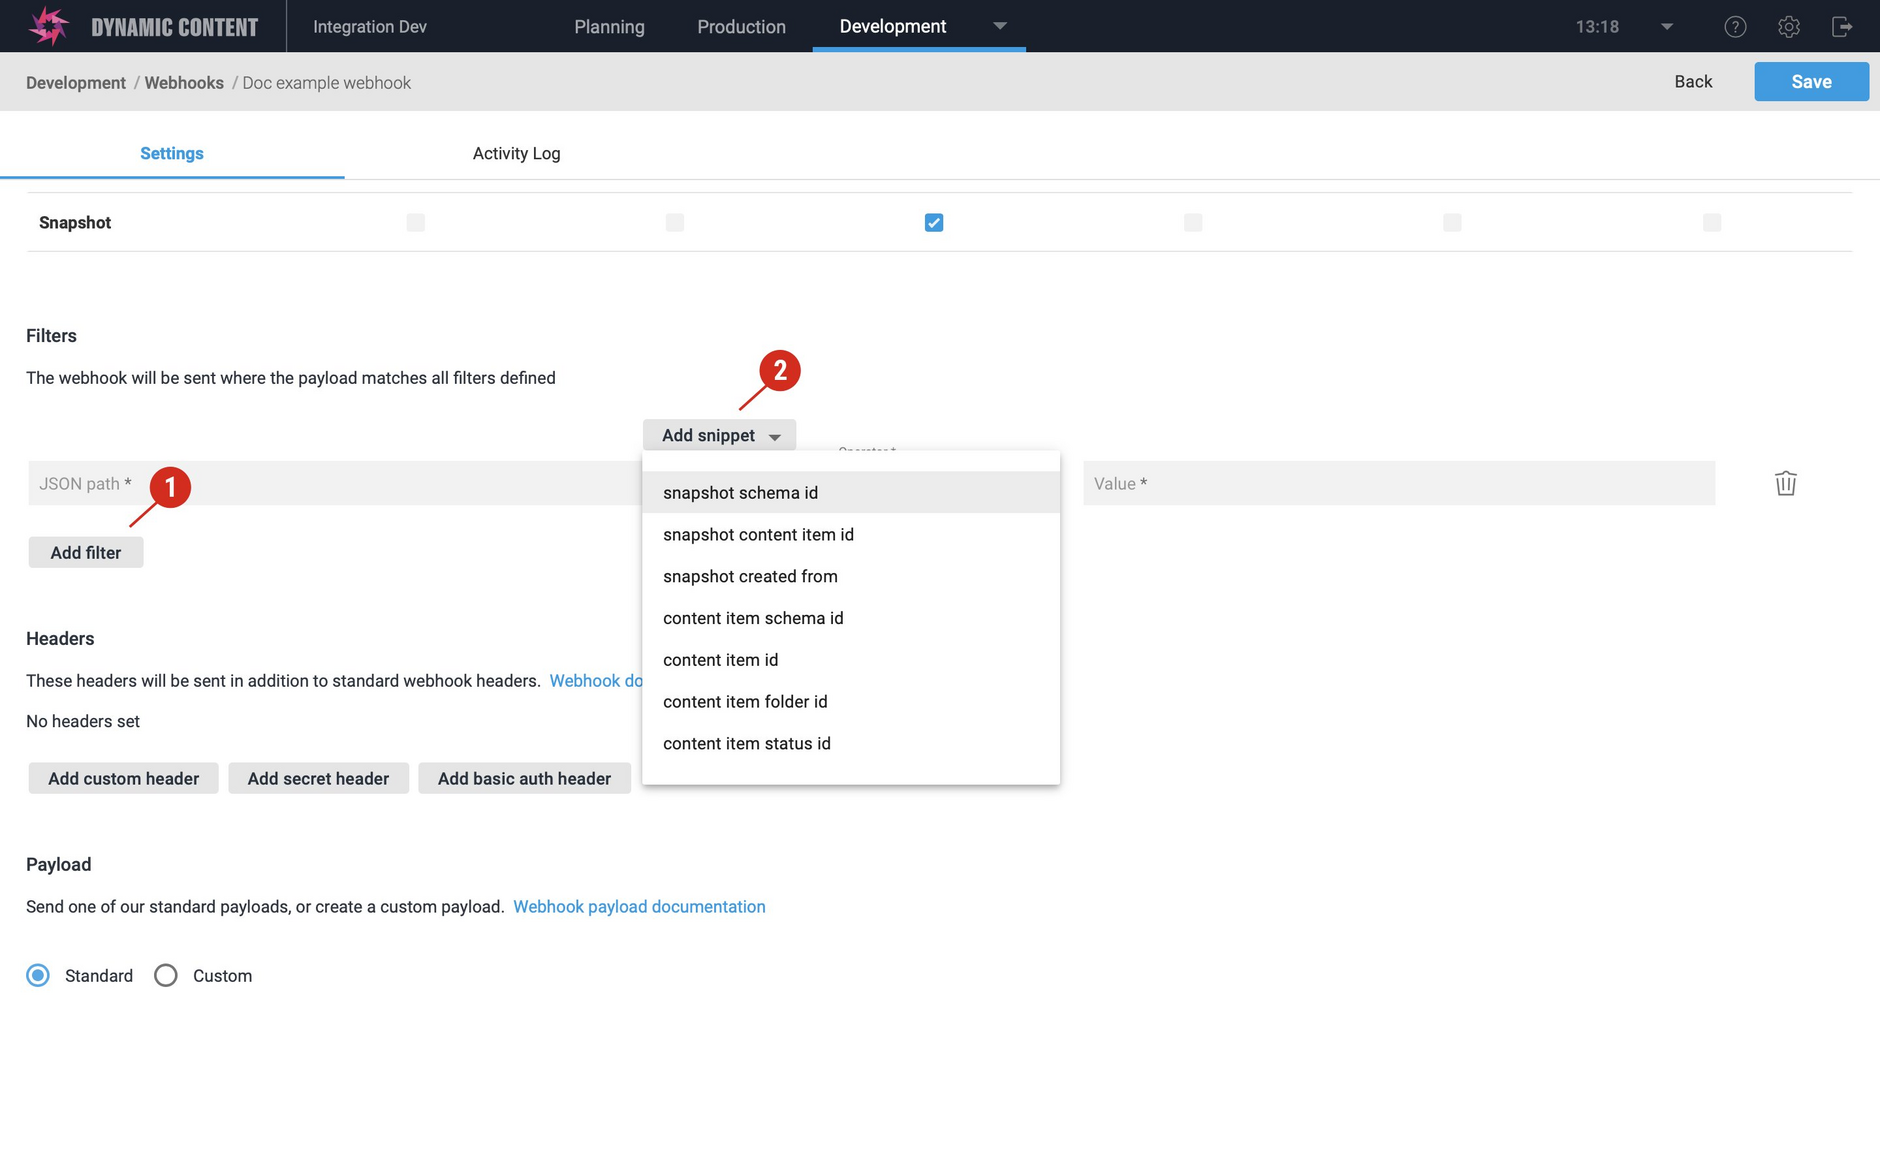
To specify a filter click the "Add filter" button (1 in the image below). A filter is specified in JSON Path format using the contents of the webhook payload.
The "Add snippet" menu (2) contains some common JSON path snippets to use as filters.
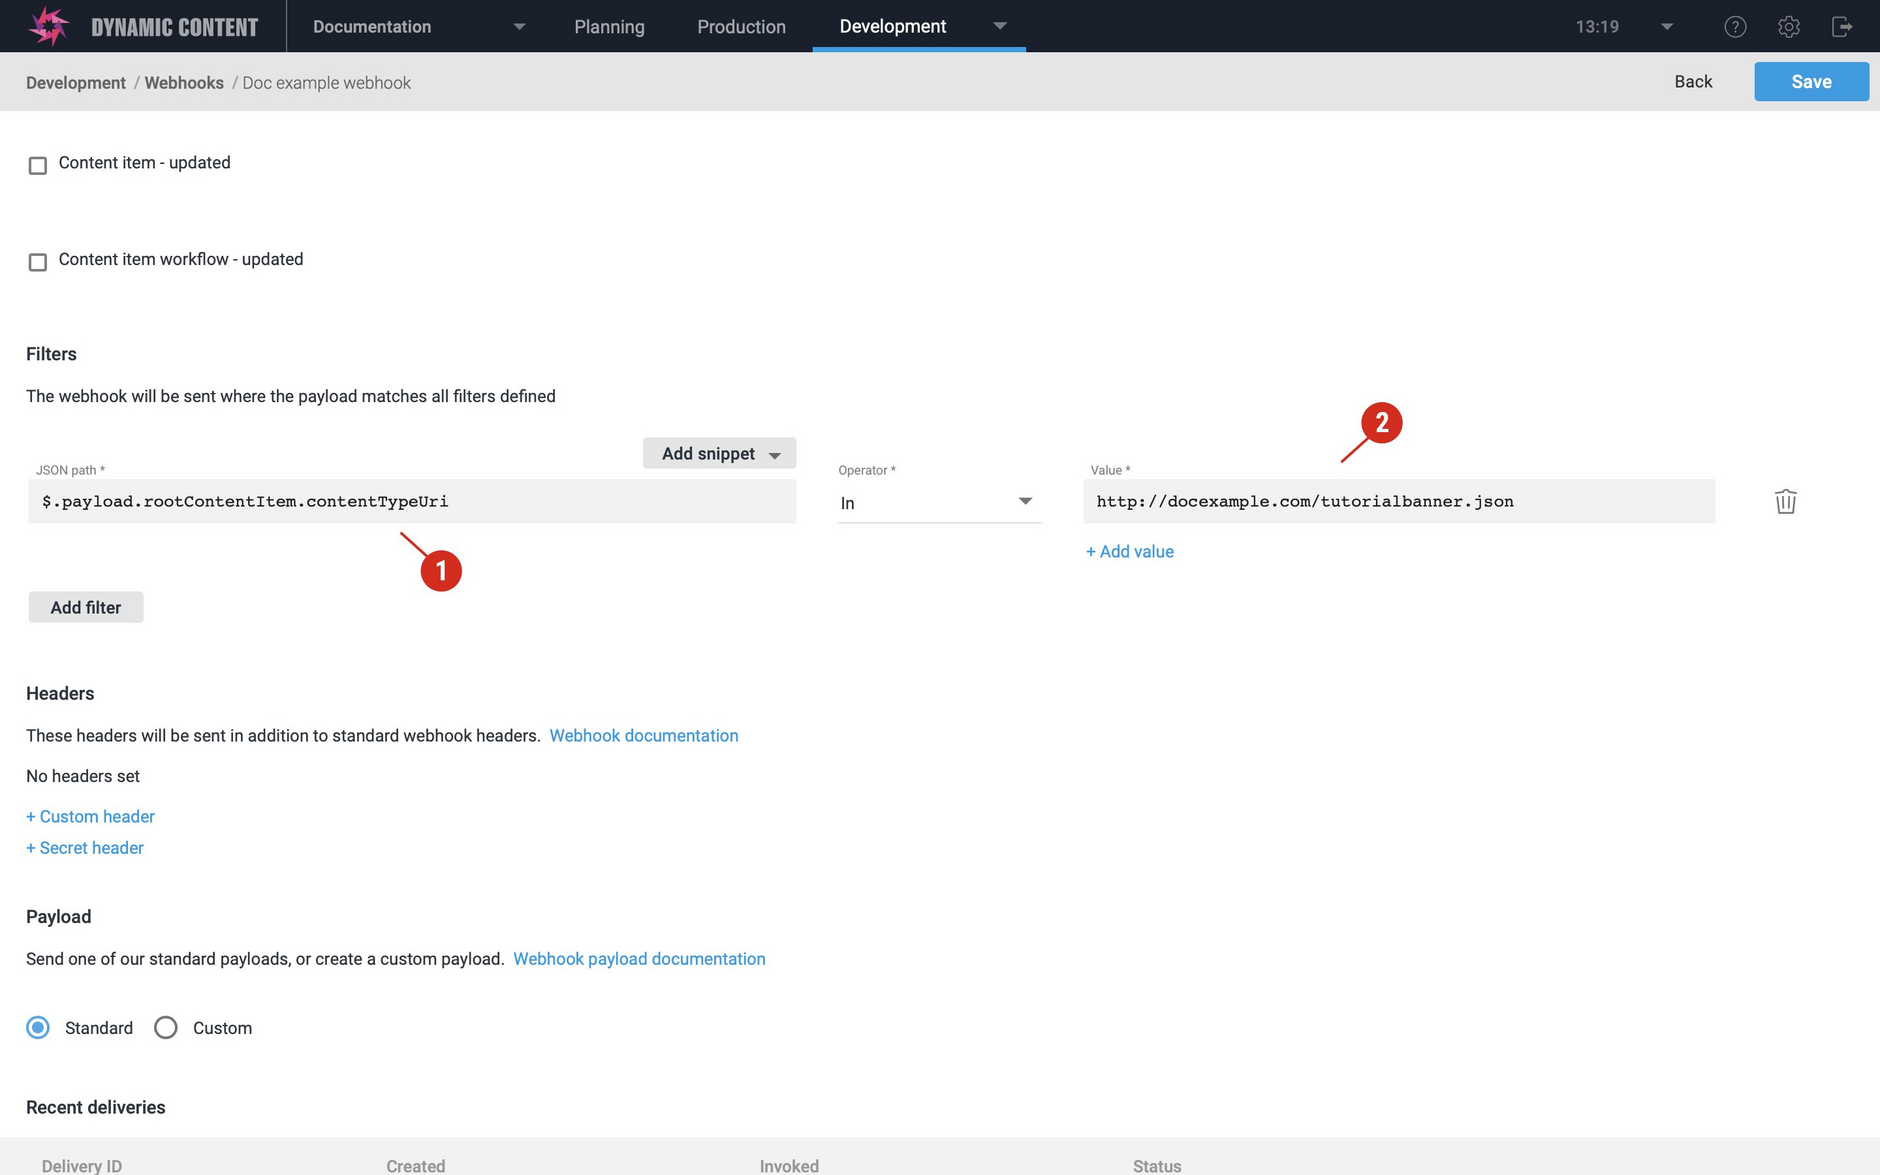
To choose to filter on the content type, choose "snapshot schema id" (assuming the trigger is Snapshot published). This will add the following to the JSON path box (1 in the image below):
Enter the schema id of the content type you want to use as a filter in the value field (2). In this example we only want to trigger the webhook when a content item created from the tutorial banner content type is published. So we'll enter its URL:
Note that the value field must be an exact match.
You will need to set the JSON path to match the standard payload for the webhook trigger you've chosen. For example, for "Content item- created" you might choose the "content item id" snippet.
A filter will be ignored (and the webhook sent) if the JSON path does not exist in the payload.
Filtering on array valuesLink copied!
The In and Equals filters support arrays, and one of the uses for this is to filter on the value of multiple delivery keys.
In the following example we're using the "content item- updated" webhook event and setting multiple "In filter values to check for variant delivery keys set to "mens/shoes" or "womens/shoes". If either of these conditions is met then the filter condition will pass.
To filter on the variant delivery key values array we use the following syntax:
_meta.deliveryKeys.values[*].value.
The path will depend on the webhook payload, but in this case it is:
$.payload.body._meta.deliveryKeys.values[*].value
Adding multiple filtersLink copied!
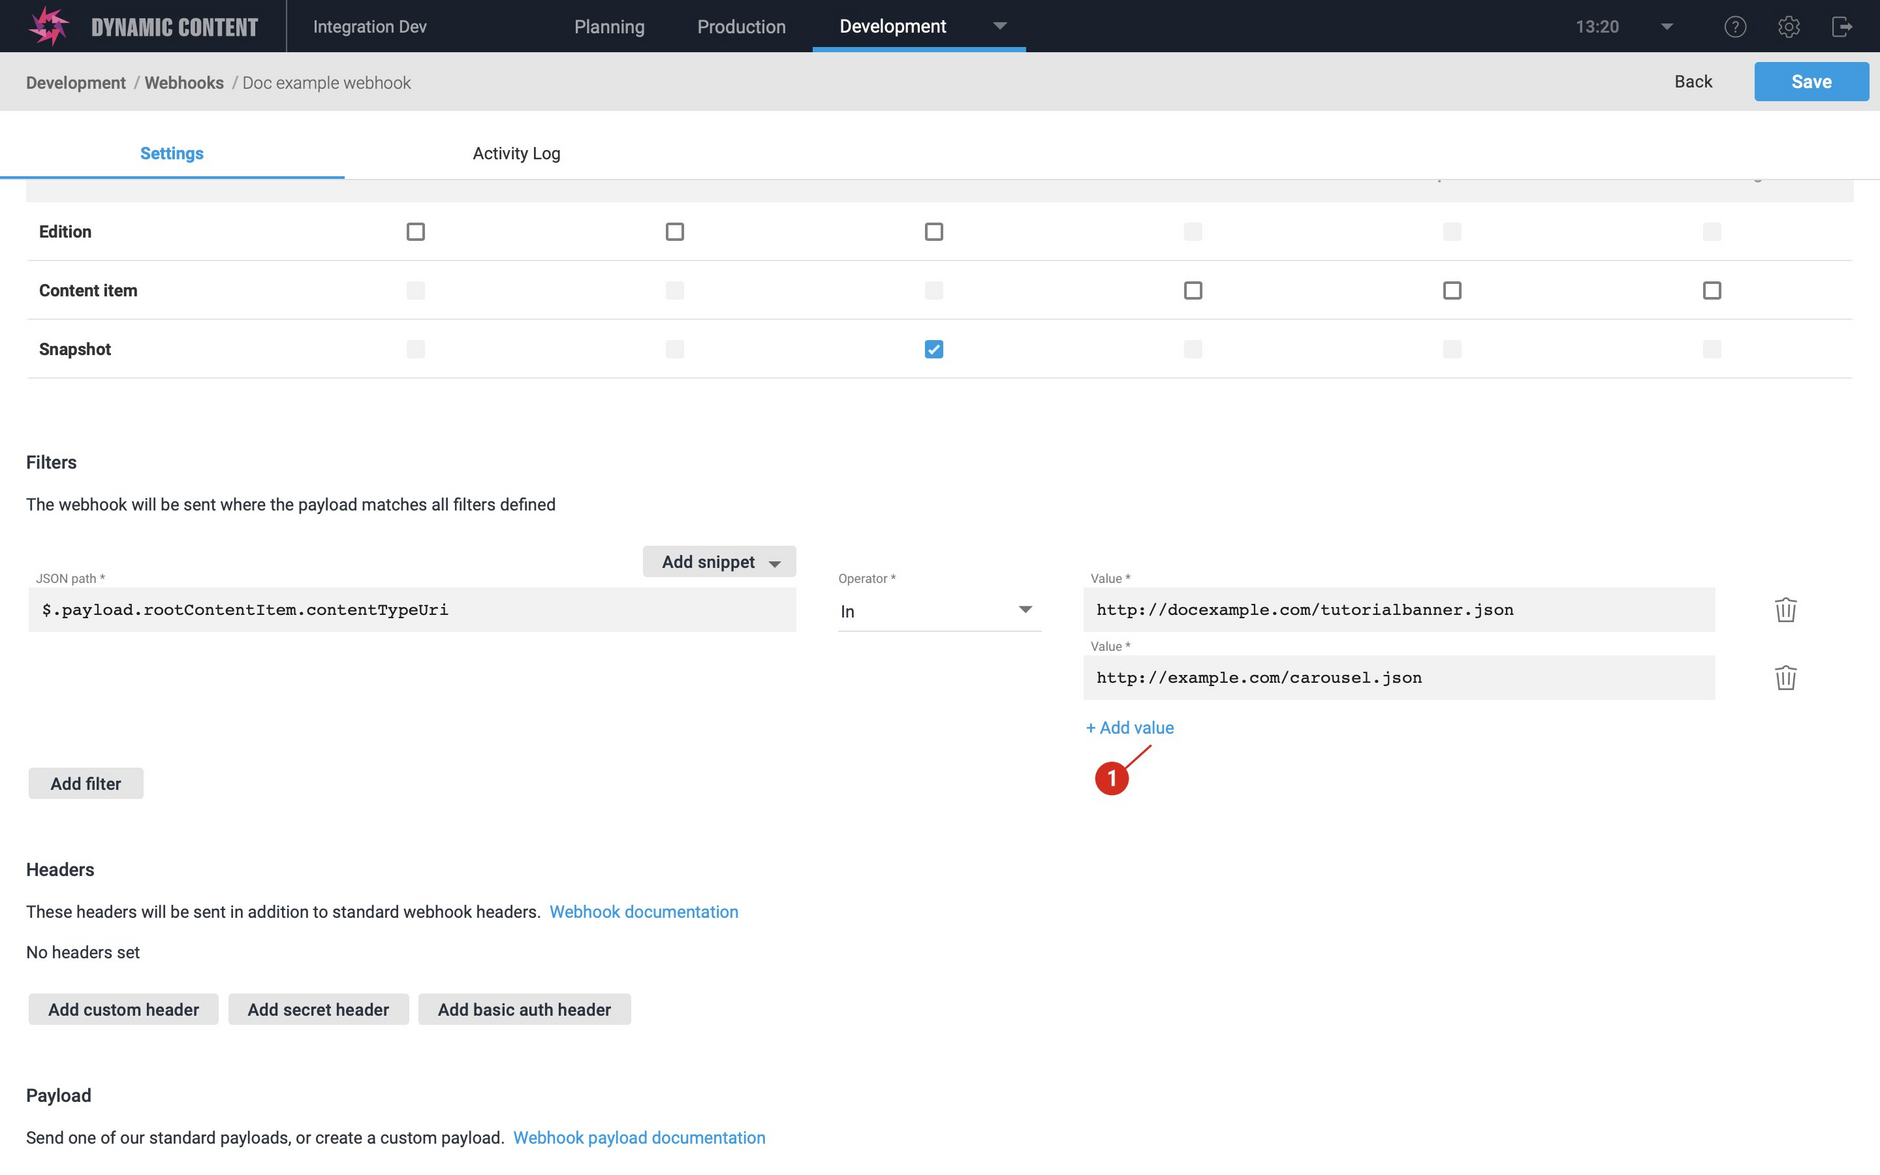
You can also use the "Add filter" button to add further filters. Each filter can use either the Equal, In or Is Present operators. Use Equal when you want to match a single value and In when you want to match one of a set of values.
For example, if we wanted to trigger the Doc example webhook when either a banner or a carousel content item was published, then we can specify multiple values in the content type filter using In.
If you have multiple filters then all filters must match. For example, if you are filtering on both the content type and the content item status, then the webhook will only be triggered if both the filters are matched.
The only exception is if the JSON path specified in a filter is not valid or the value it references is not found. In this case the filter will be ignored and the webhook will be triggered if the conditions specified in all the other filters are met. You can use the Is Present filter to ensure that the webhook request is only sent if a specified field is present.
The Is Present filterLink copied!
Fields such as locale and workflow state will only be included in webhook payloads when they have a value set, and not all of the payloads for each webhook event will include these values. Using the Is Present filter you can check for the existence of a specified JSON path, such as payload.workflow, and the filter condition will only be passed if the field exists in the payload.
In the example shown below, we've set the webhook trigger to "content item- updated" and the payload for this event will only include the workflow status if one is set for the content item.
The Is Present filter is selected with a JSON path of $.payload.workflow. The filter condition will only be met (and the webhook request sent) when a workflow status is included in the payload.
Webhook activity logLink copied!
When a content item is published, the "recent deliveries" in the webhook activity log for the Doc example webhook will indicate whether the webhook is triggered. Click the "Activity log" tab at the top of the window to view the recent deliveries.
In the image below the highlighted entry in the list indicates that the webhook was triggered, while the entry above has a status of "Not sent (filtered)". This indicates that a content item was published, but it was not a banner or a carousel, so it was filtered out and the webhook URL was not invoked.
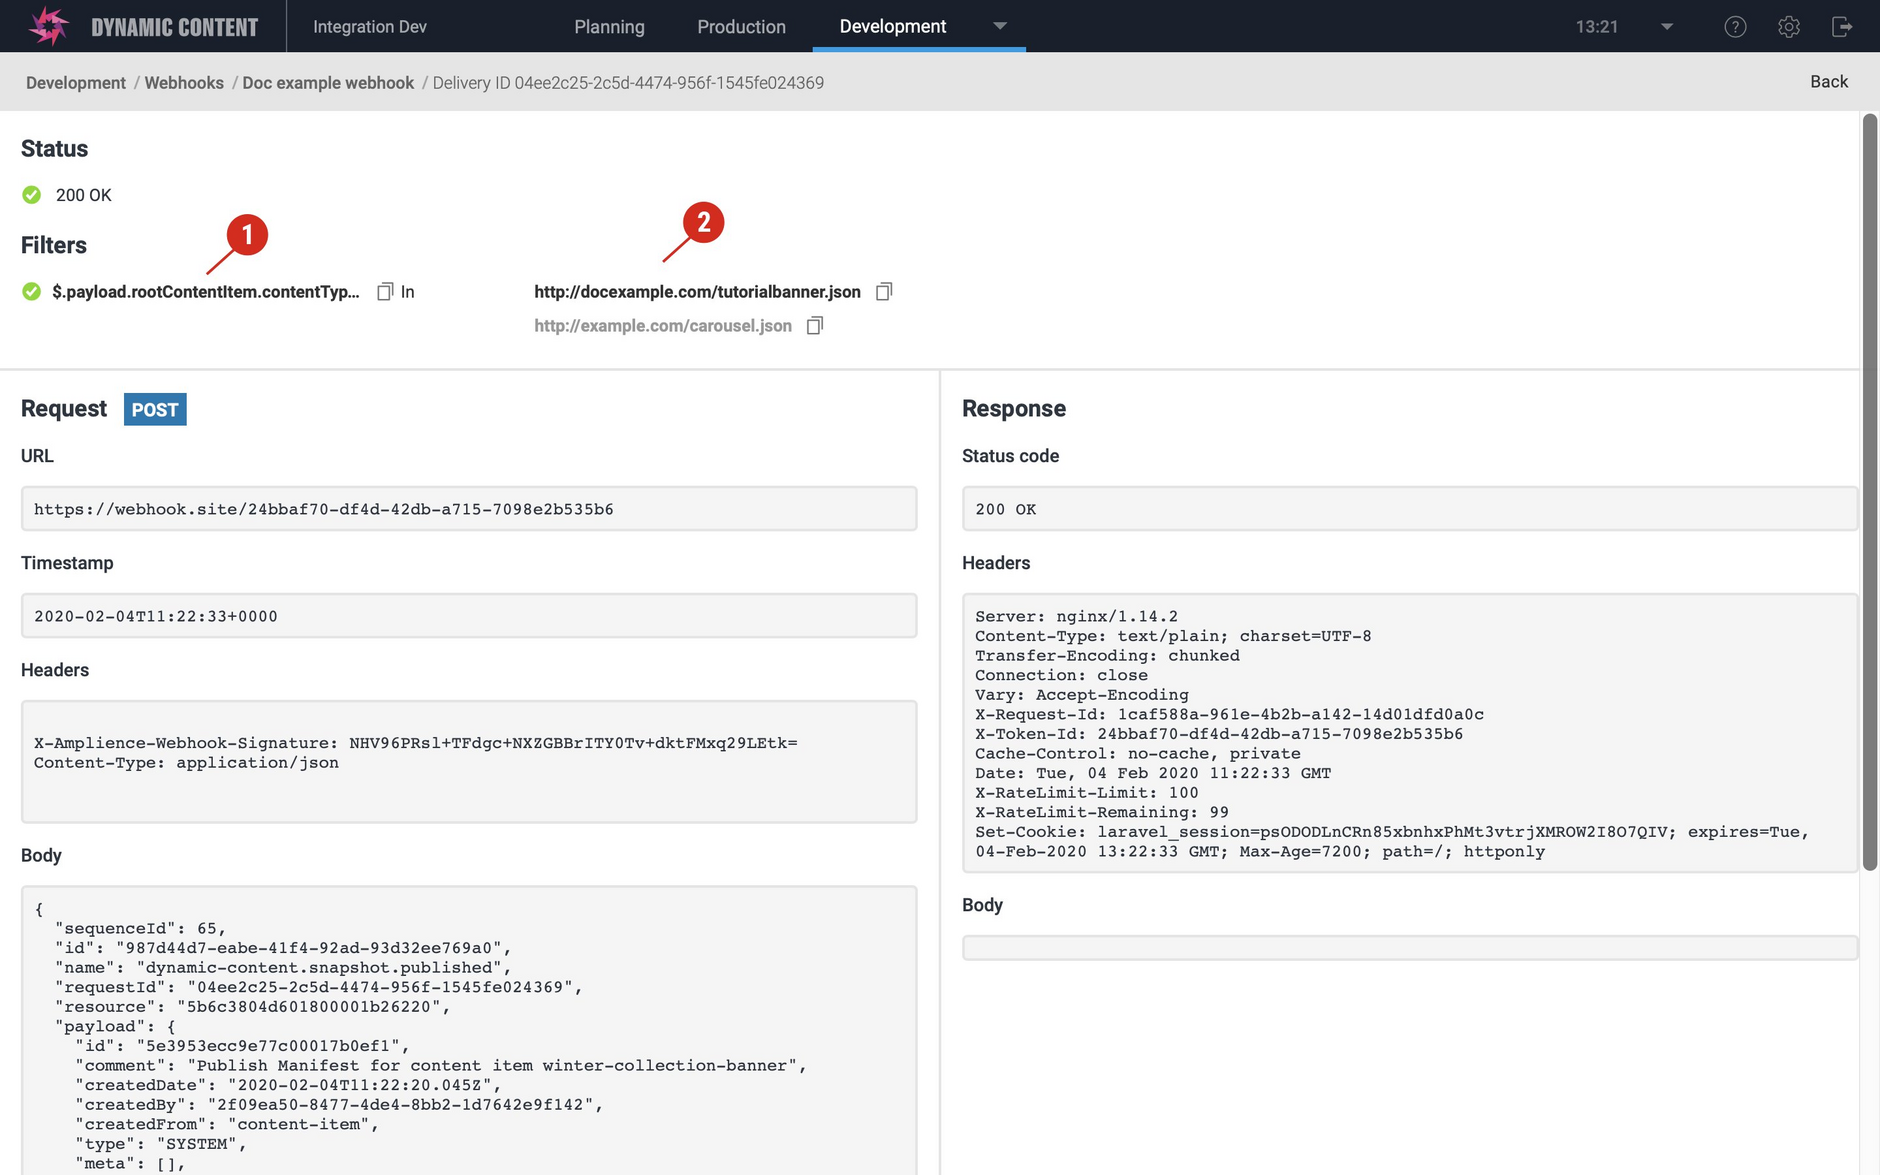
Clicking "View details" on the webhook invoked when a content item was published that matches the filters will display the delivery details, including the filter that was matched (1) and the value that matched the filter (2). In the example below you can see that the content type filter was matched and a banner content item was published.
HeadersLink copied!
A webhook request will contain some standard headers, including the hashed webhook secret. An example of the standard headers is shown below:
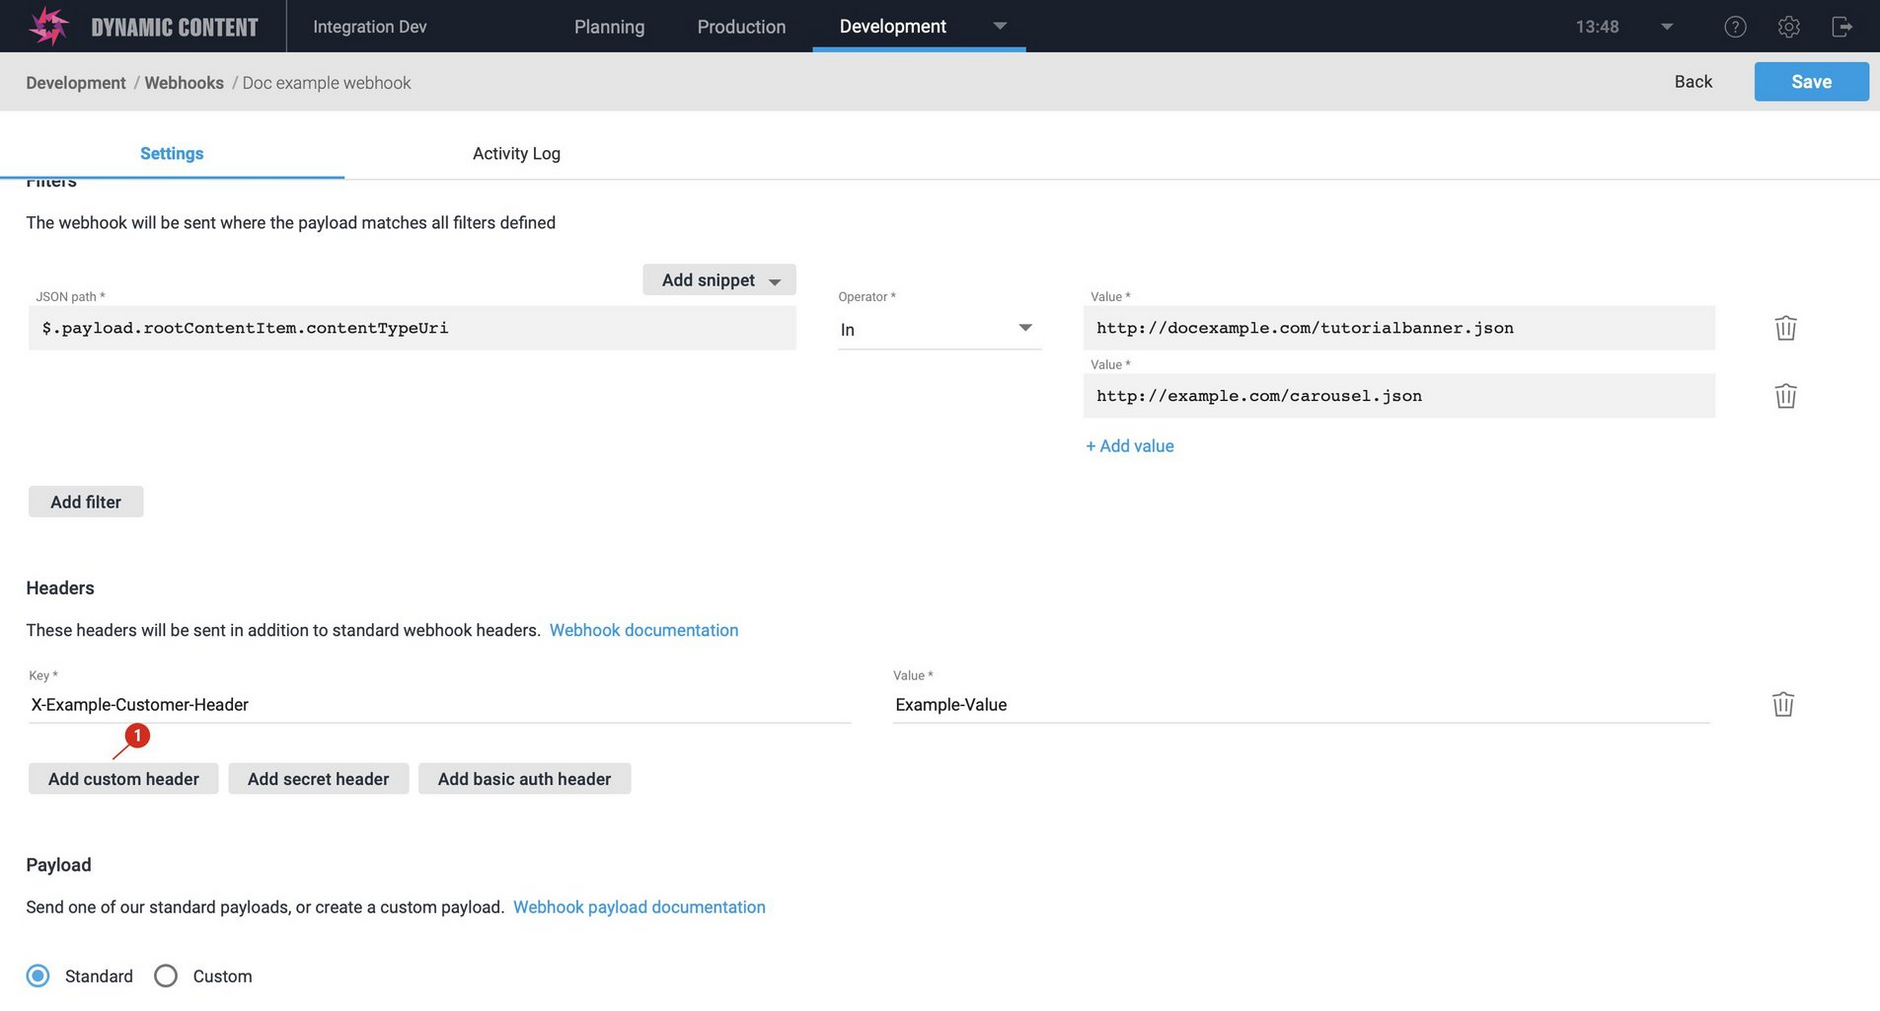
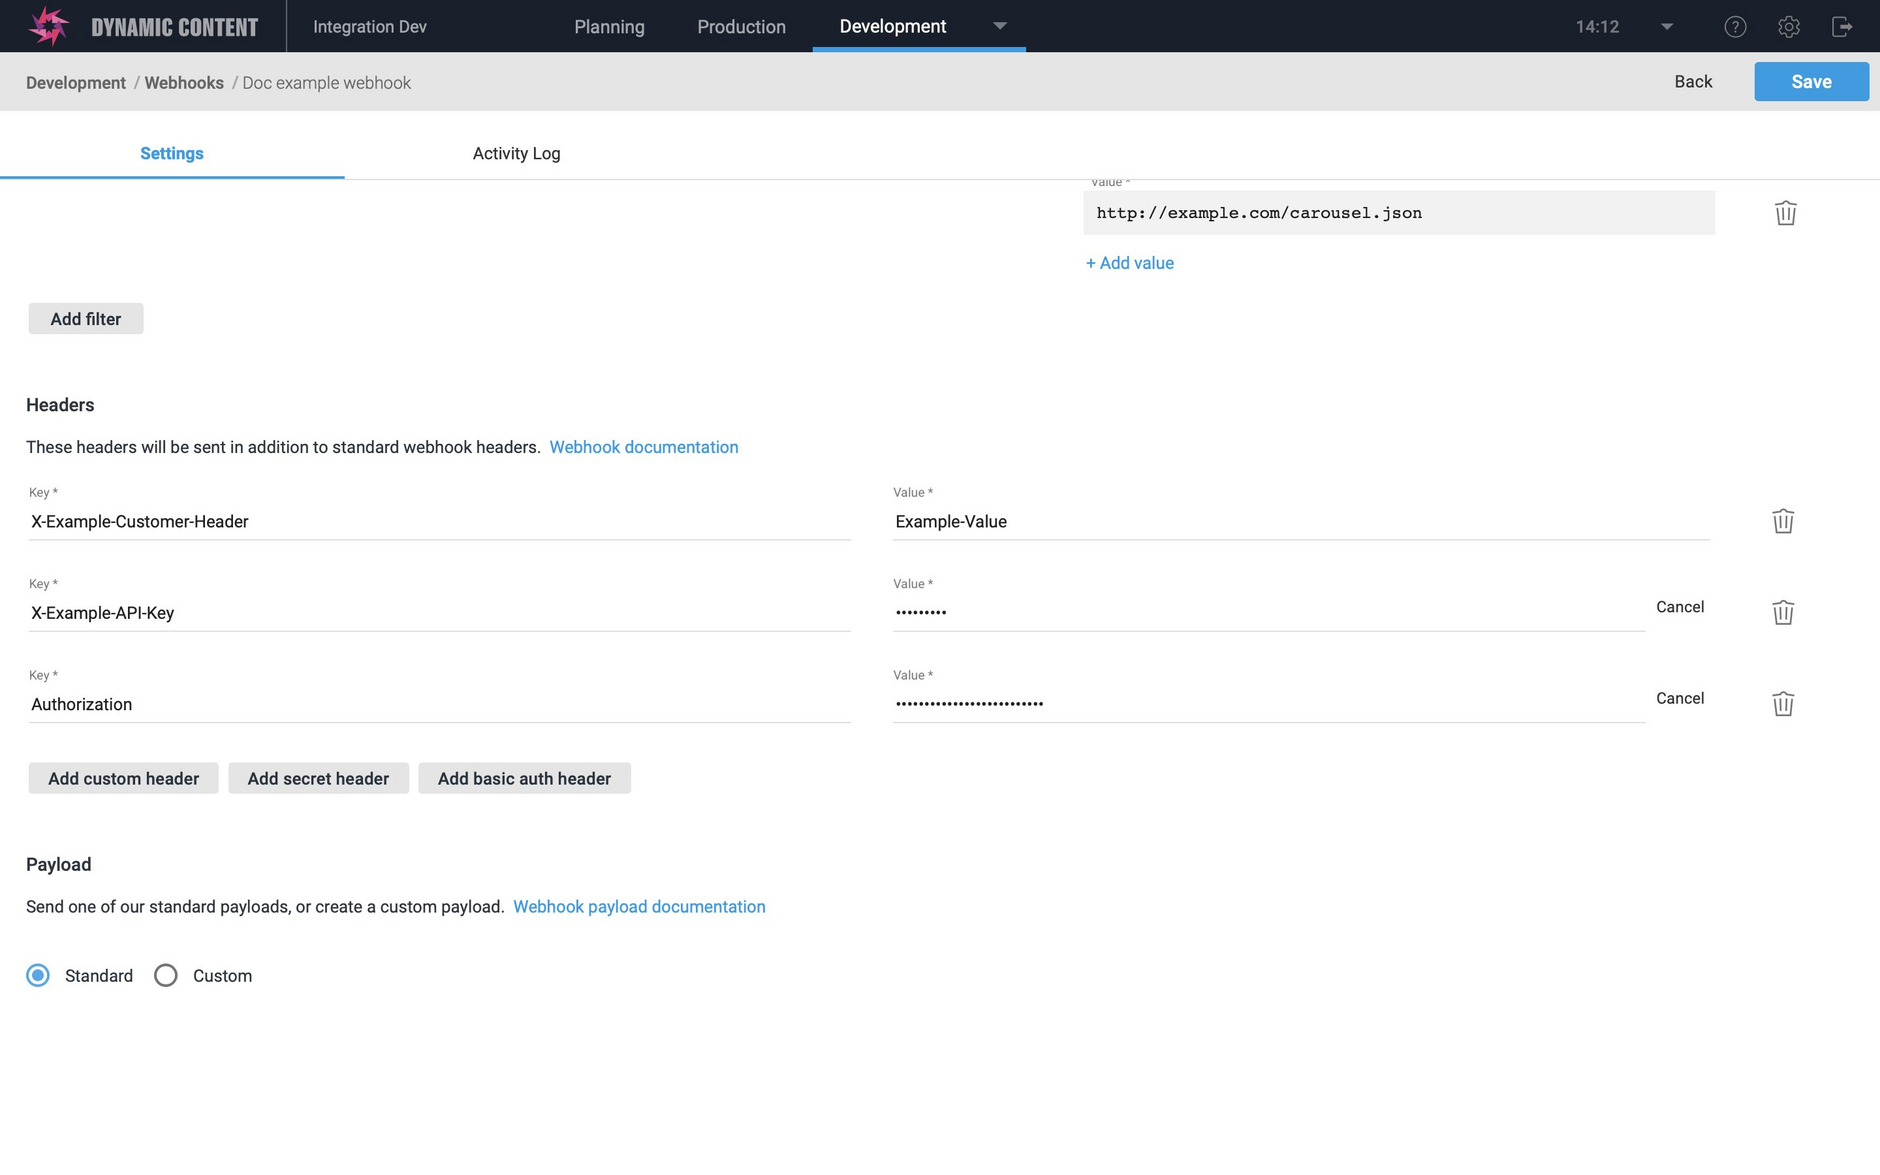
You can choose to include custom headers, each defined with a key and value. These headers can be sent in the clear or, for values such as API keys, you can define a secret header.
To add a custom header, click "Custom header" (1 in the image below) and enter the key and value.
Custom headers should not replace any of the standard headers, with the exception of the
Content-Type which you can use to specify your own content type should you choose.
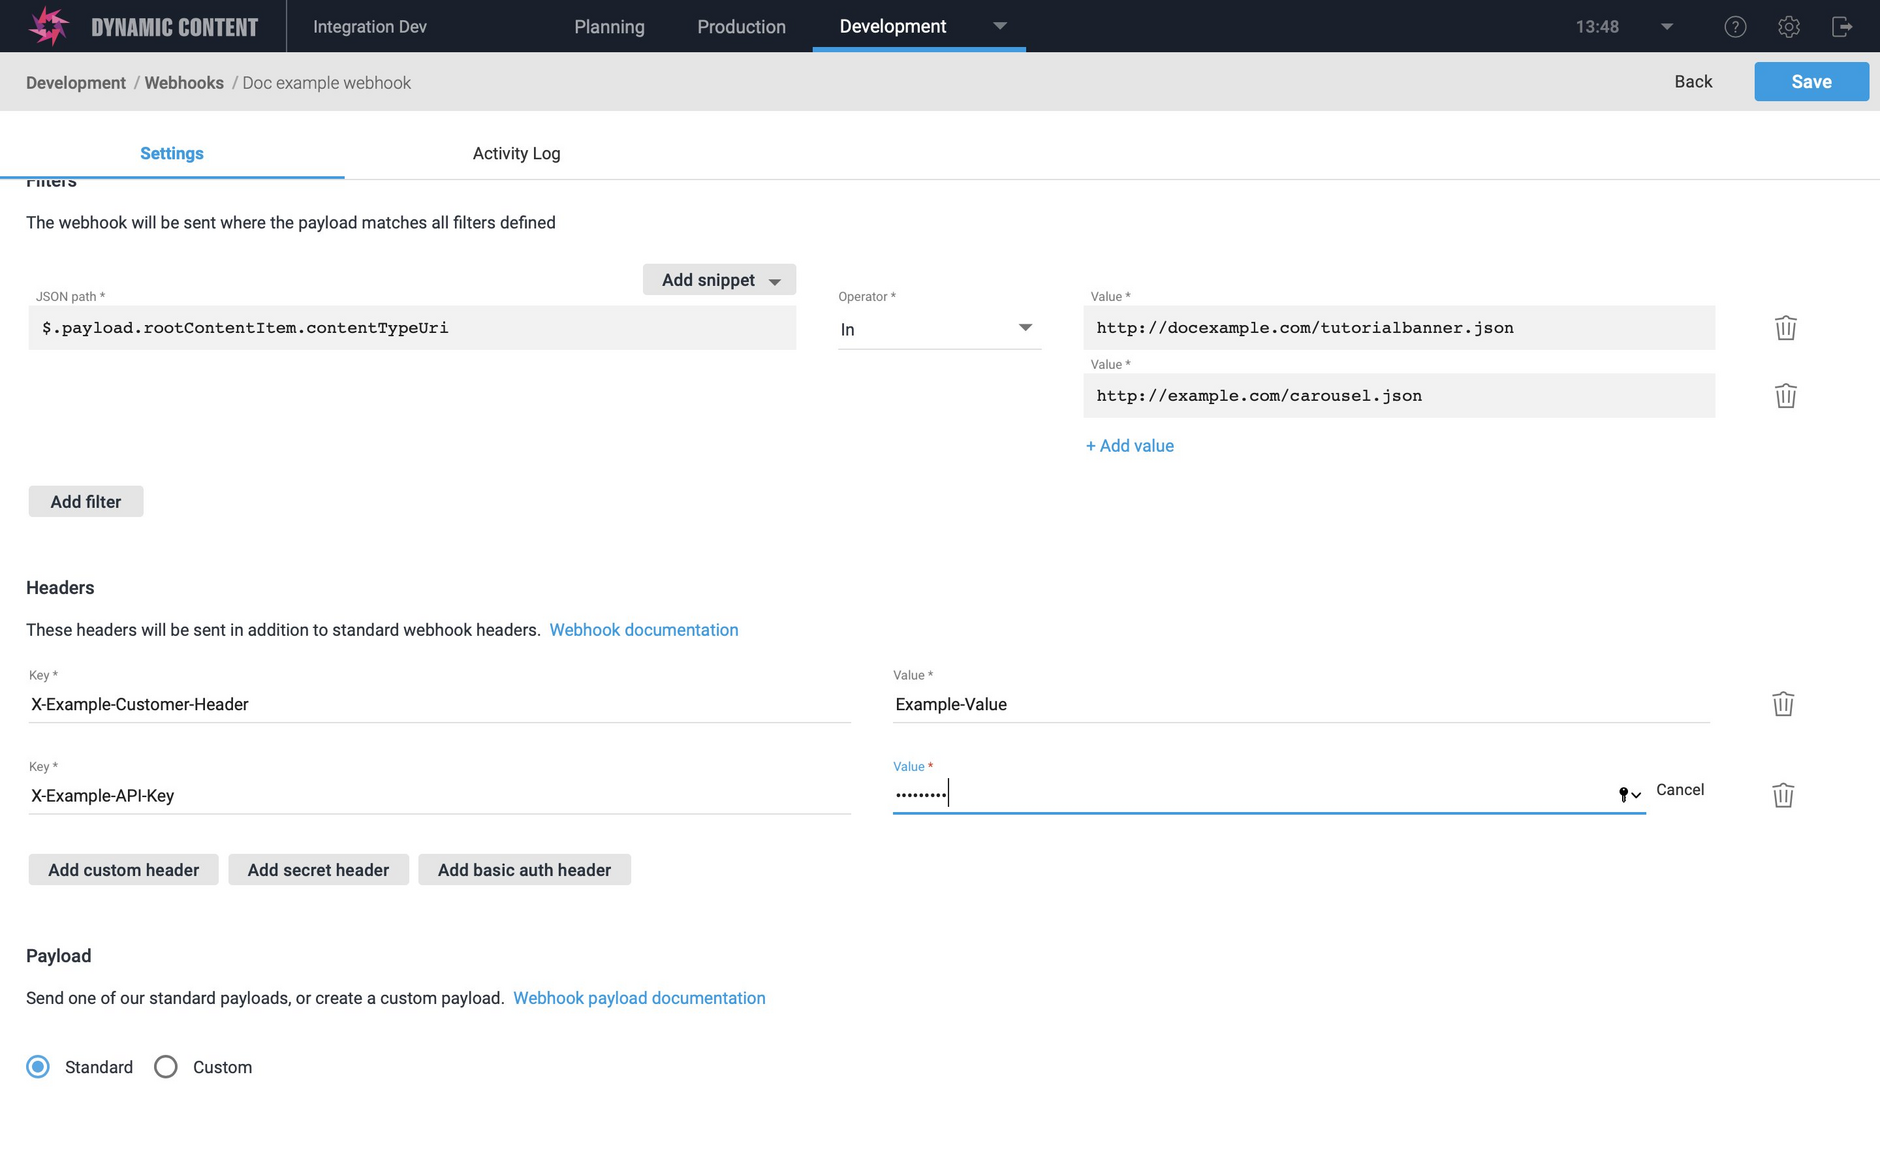
To add a secret header, click "Secret header" and click the "edit" button to the right of the value to enter your own value. This will be encrypted during transit.
When the webhook shown in the example is triggered, the webhook request will include the following headers:
Basic auth headerLink copied!
To access an API you will often have to specify a "basic auth" header. This is a header which takes the form Authorization: Basic {credentials} where credentials is a username and password separated with a ":" and base64 encoded. When you add a basic auth header, we take care of the encoding for you.
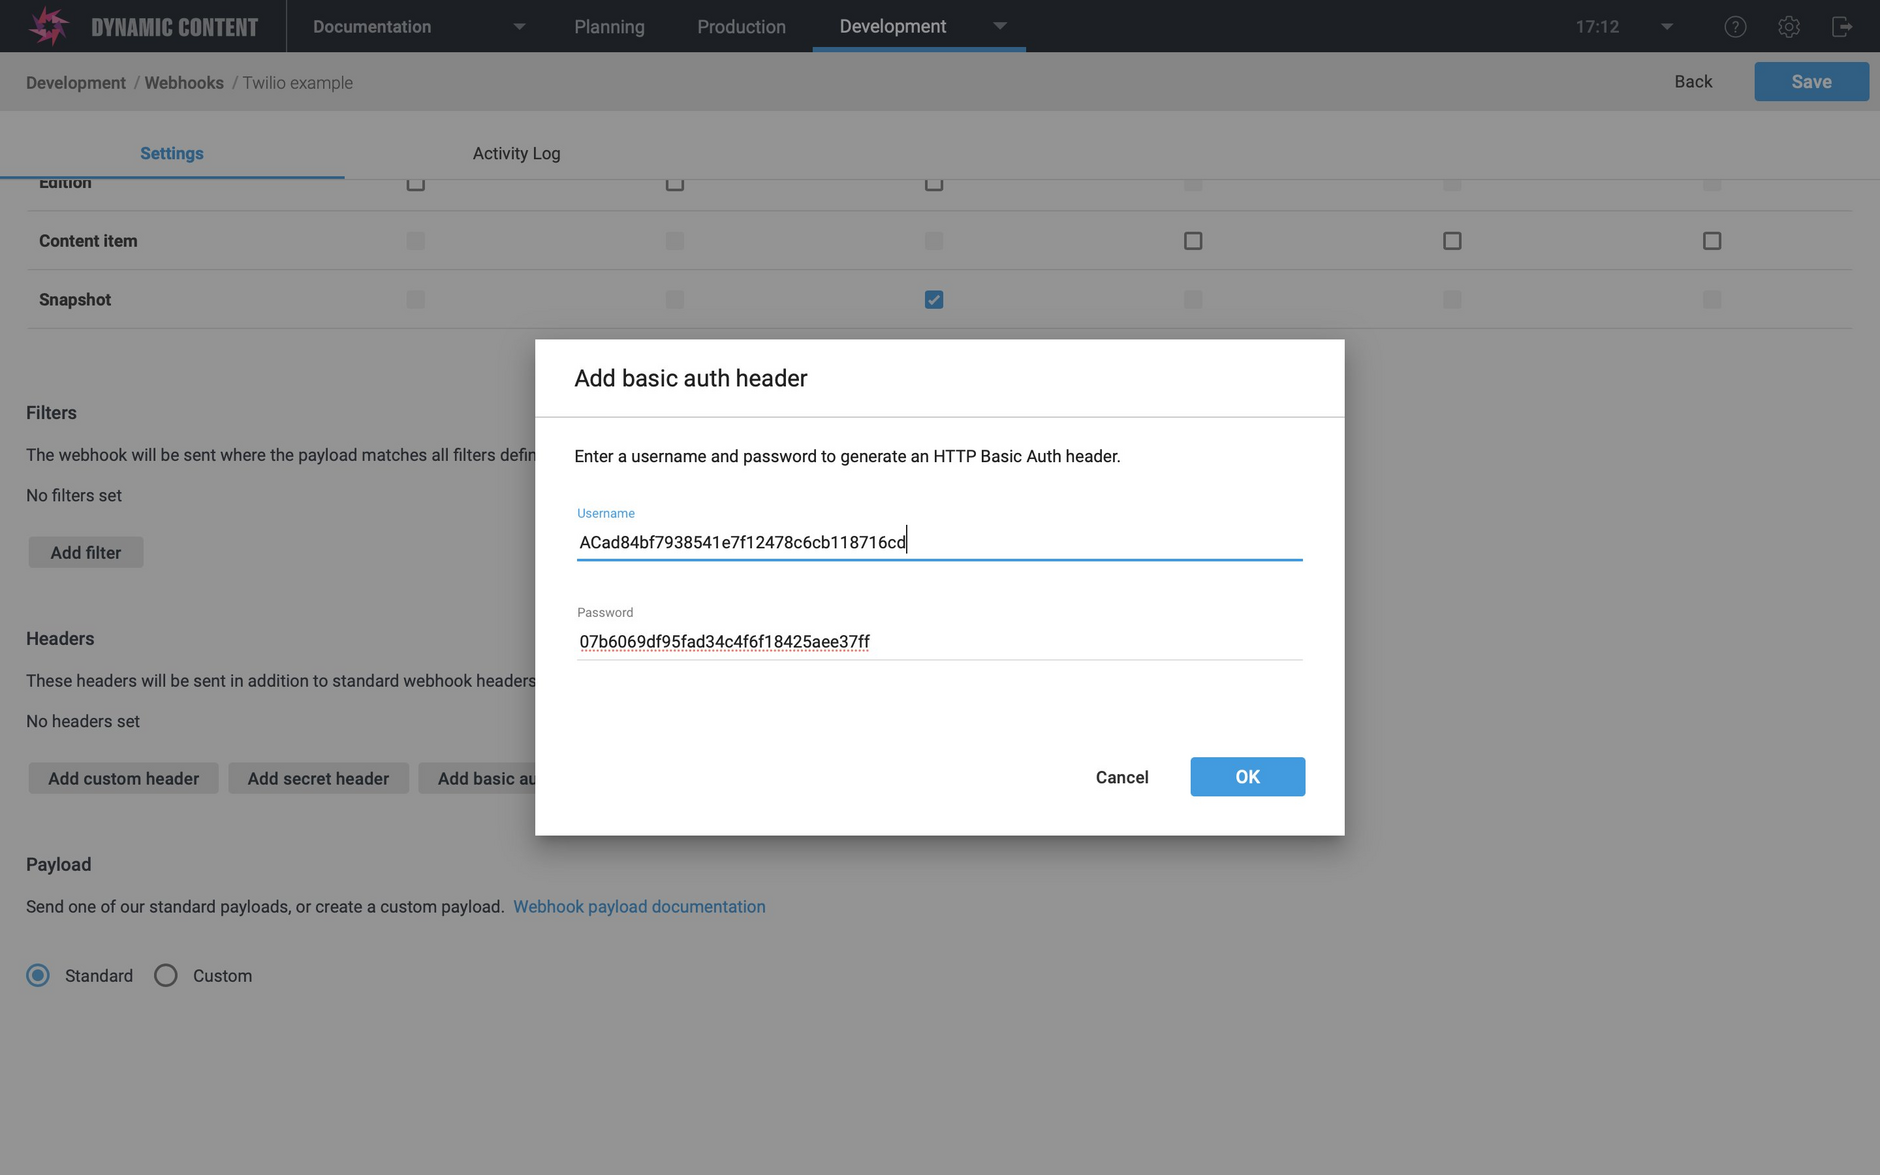
Click "Add basic auth header" and enter the username and password specified by the API you are authenticating with. You can choose to leave either of these fields blank.
Note the username and password shown below is not an actual API key and secret.
Click ok to save the header. A header with the key "Authorization" and the encoded user name and password will be added to the headers section. As with other secret headers, it will be encrypted during transit.
Webhook secretLink copied!
When a webhook is created, Dynamic Content will automatically generate a 128 character secret that is known only to the developer. This secret is used to verify that the body sent to the webhook URL has not been tampered with in transit. A hash is generated from the secret and the request body, encoded and sent in the "X-Amplience-Webhook-Signature" header that is included in the POST request sent to the webhook URL. The developer can then decode this header and compare the hash with the value generated from the received request body and the secret they have stored for this webhook.
See the Dynamic Content Management SDK for an example of how to verify the webhook signature.
To make it easier to store the secret for later use, click the Copy button- the second icon to the right of the secret. You can regenerate the secret by clicking the refresh icon or replace the generated secret with your own value.
Custom payloadsLink copied!
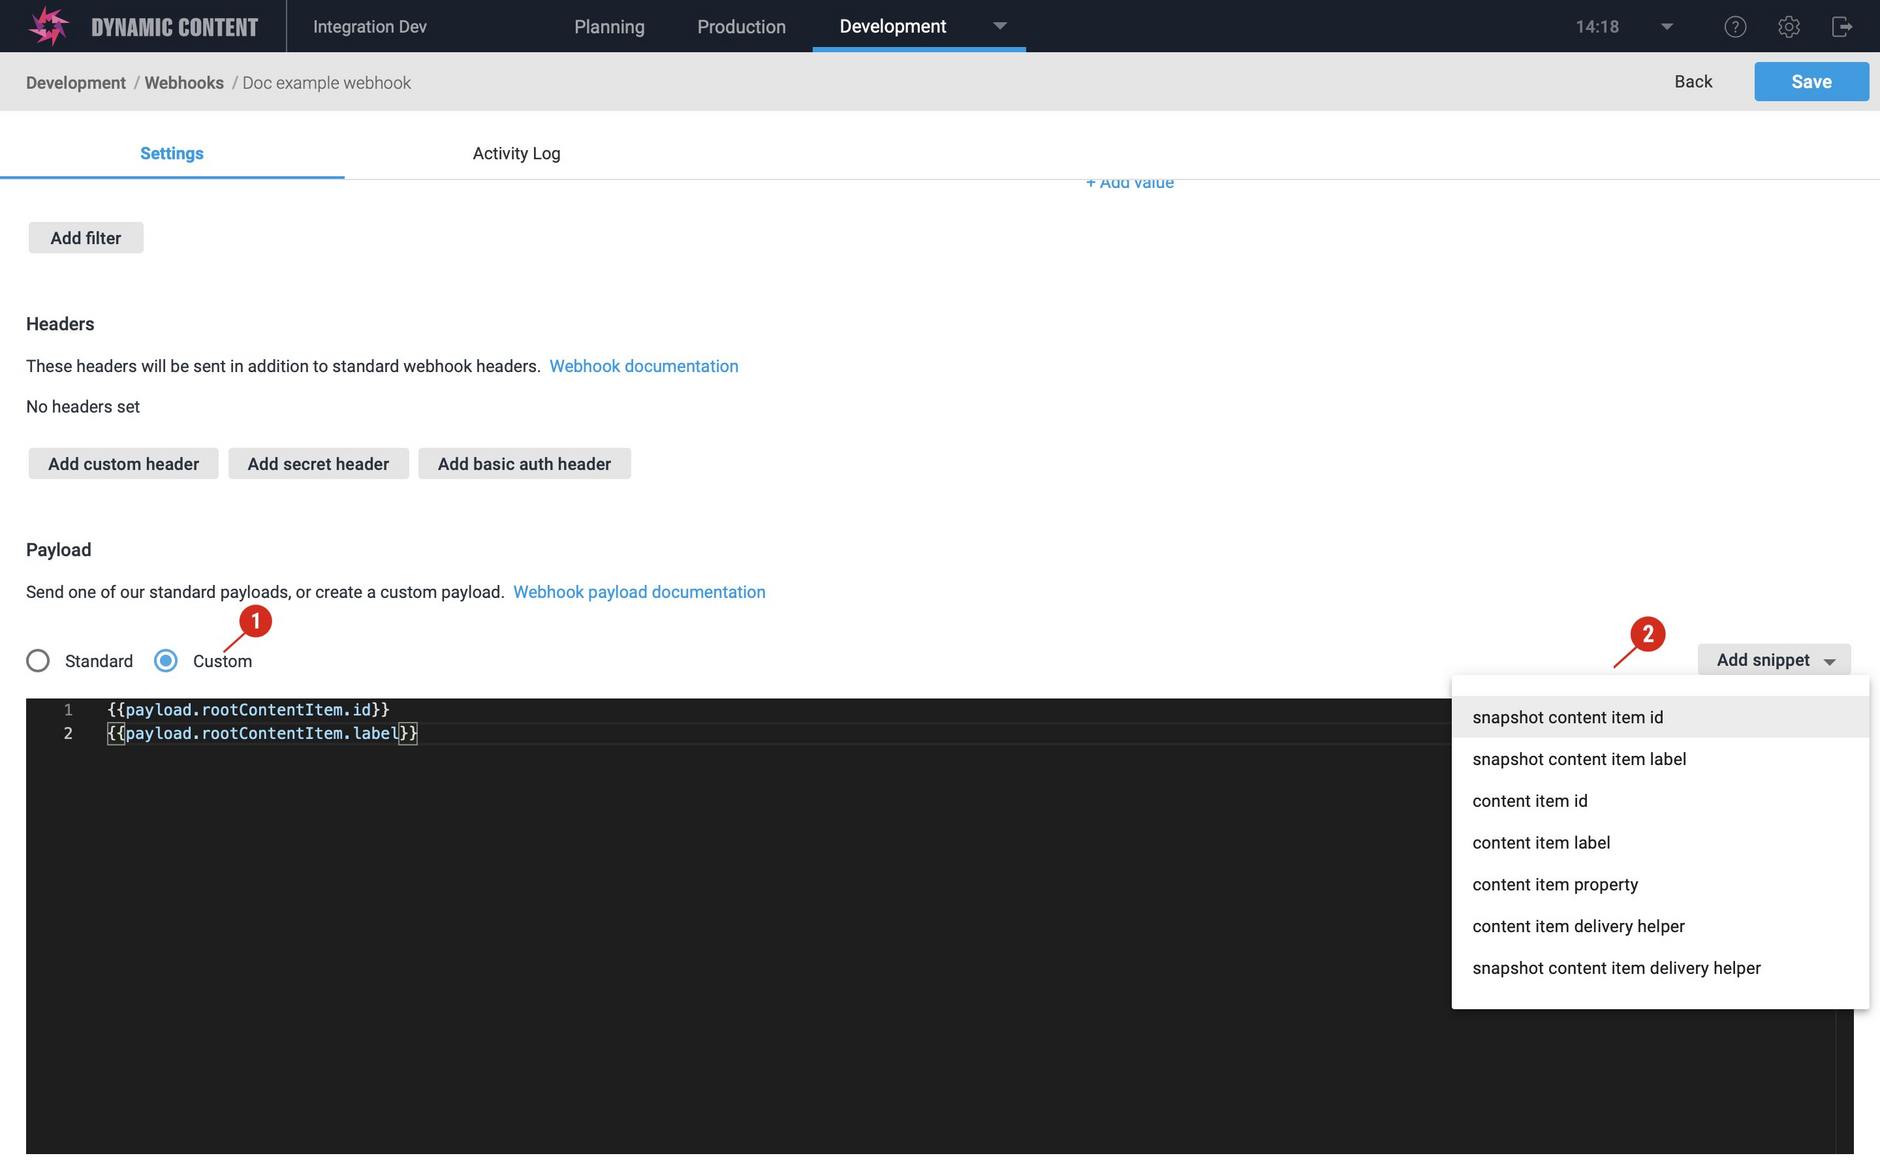
By default when a webhook is triggered, we will send the standard payload, but you can choose to specify a custom payload. The custom payload is specified in handlebars format and will generally be used to generate JSON output.
To add a custom payload, choose the "Custom" radio control in the Payload section (1 in the image below) and enter the handlebars in the box. You can enter your own handlebars or choose a snippet from the menu on the right (2). In this example we are generating JSON from the rootContentItem.id and rootContentItem.label included in the standard payload.
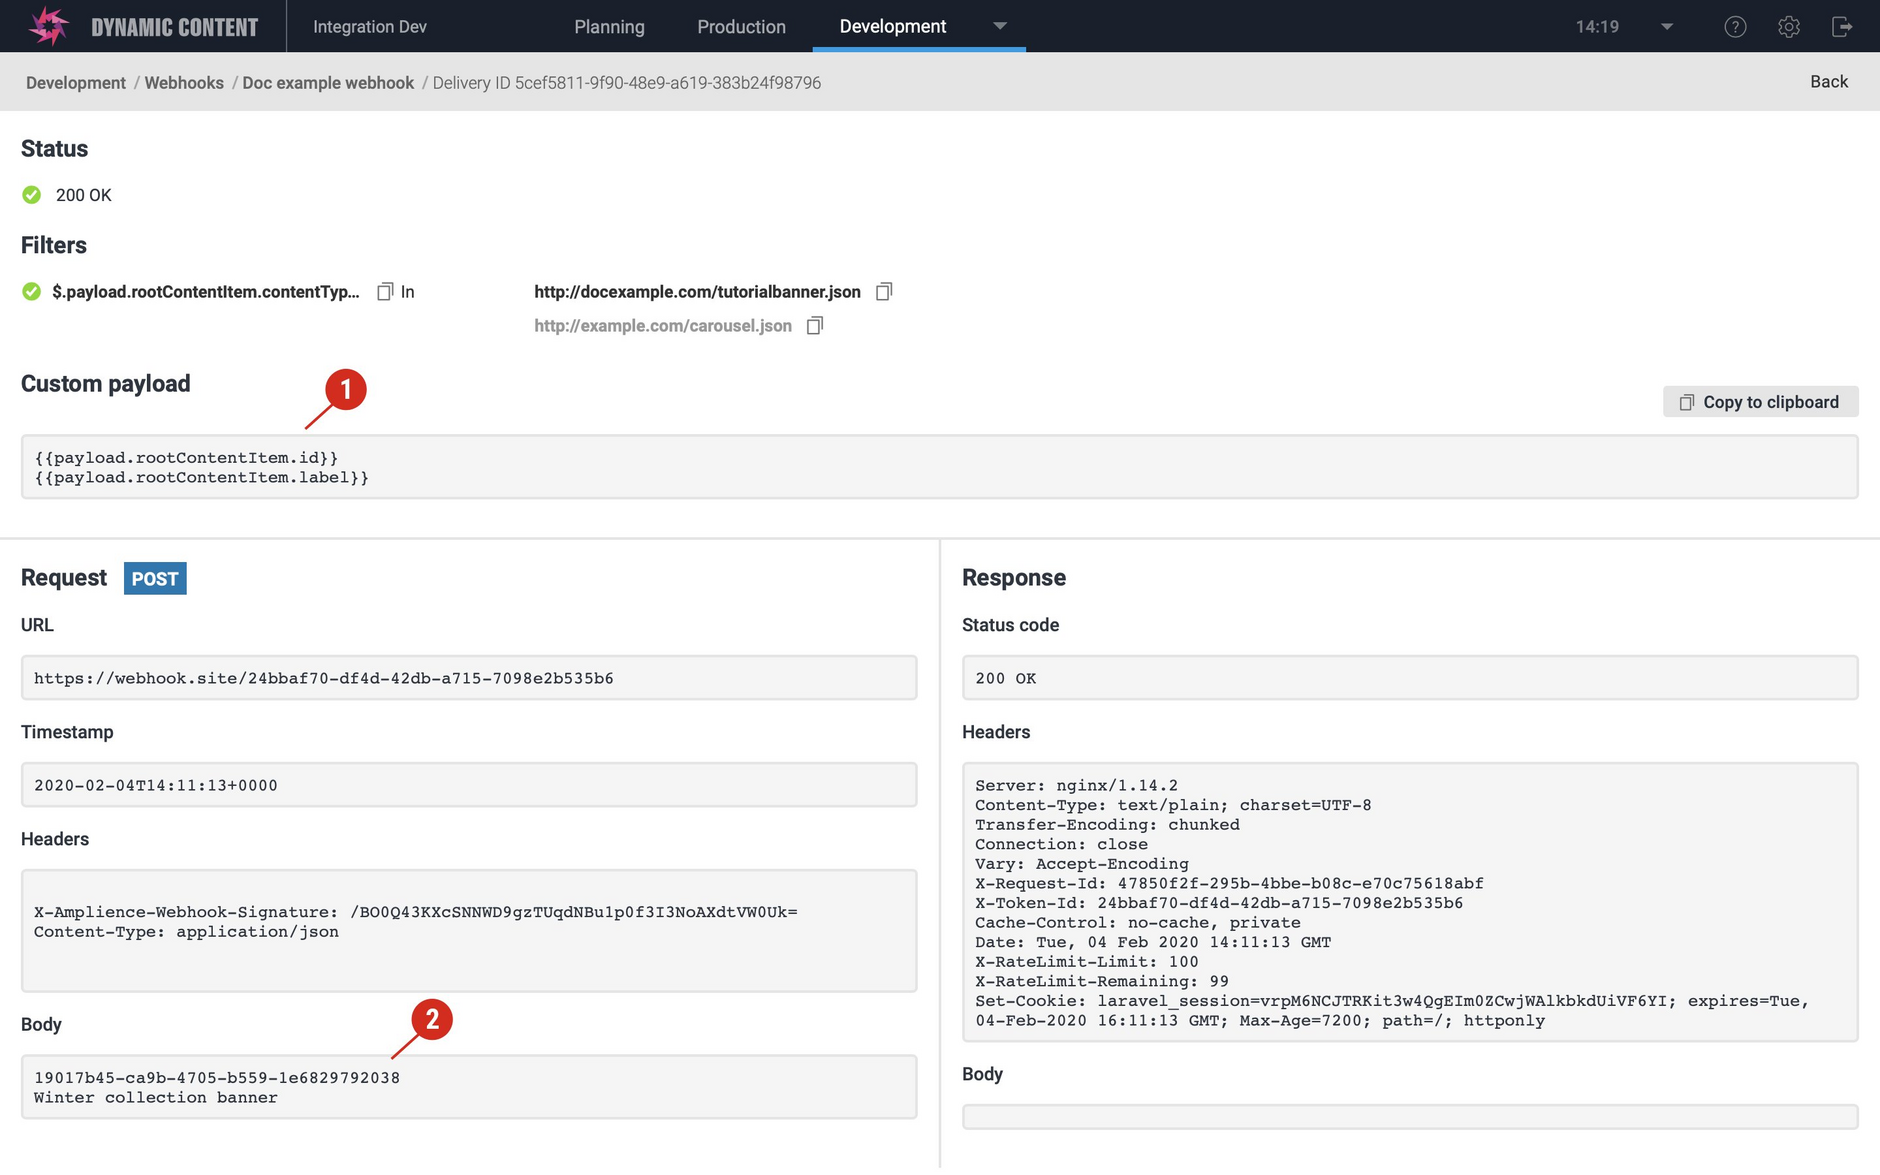
When the webhook is triggered, in this case from the snapshot published event, the JSON is generated from the handlebars in the custom payload (1), as shown below in the request body (2). The custom payload is included in the activity log for each request, making it easier to track down errors if you have subsequently changed the handlebars used to build the payload.
Restrictions on the custom payloadLink copied!
There are some restrictions when specifying a custom payload:
- The custom payload cannot refer to other templates
- The custom payload will generally be used to generate JSON output, but we only validate the handlebars template, we do not validate the output
- The maximum size of the handlebars template that defines the custom payload is 5 KB
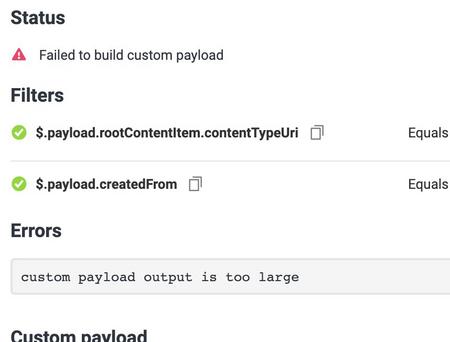
- For a given webhook event, the maximum size of the output is 200 KB. When the custom payload is processed, if the resulting output is > 200 KB then an error will be generated. An example of the error is shown below.
Supported handlebars helpersLink copied!
When specifying a custom payload you can make use of several handlebars helpers.
Below is the list of supported helpers:
- object
- string
- array
- collection
- comparison
- date
- html
- markdown
- math
- misc
- number
- regex
- url
Below is the list of helpers that are not supported:
- map
- some
- sortBy
- md
Handlebars versionsLink copied!
We currently use the following handlebars versions:
- handlebars: 4.7.7
- handlebars-helpers: 0.9.8
withDeliveryContentItem helperLink copied!
The handlebars helper: {{withDeliveryContentItem}} can be used within the custom payload to get content from the delivery API. This allows you to supplement the information that is provided in the standard payload for a webhook event. This is particularly useful for retrieving linked content, for example. You can also use the helper to filter content by locale.
ParametersLink copied!
withDeliveryContentItem takes up to 6 string parameters:
contentItemId: the id of the content item to retrieveaccount: the Amplience account name (for example: ampproduct)stagingEnvironment: The virtual staging domain to use to retrieve unpublished content. It's recommended to use a staging URL to get an accurate reflection of the content item version when the webhook event was triggered, however the production URL:https://cdn.c1.amplience.netcan be used if this is not a concern. For snapshot payloads, generated by the "snapshot published" webhook event, for example, you should also specify snapshotId.
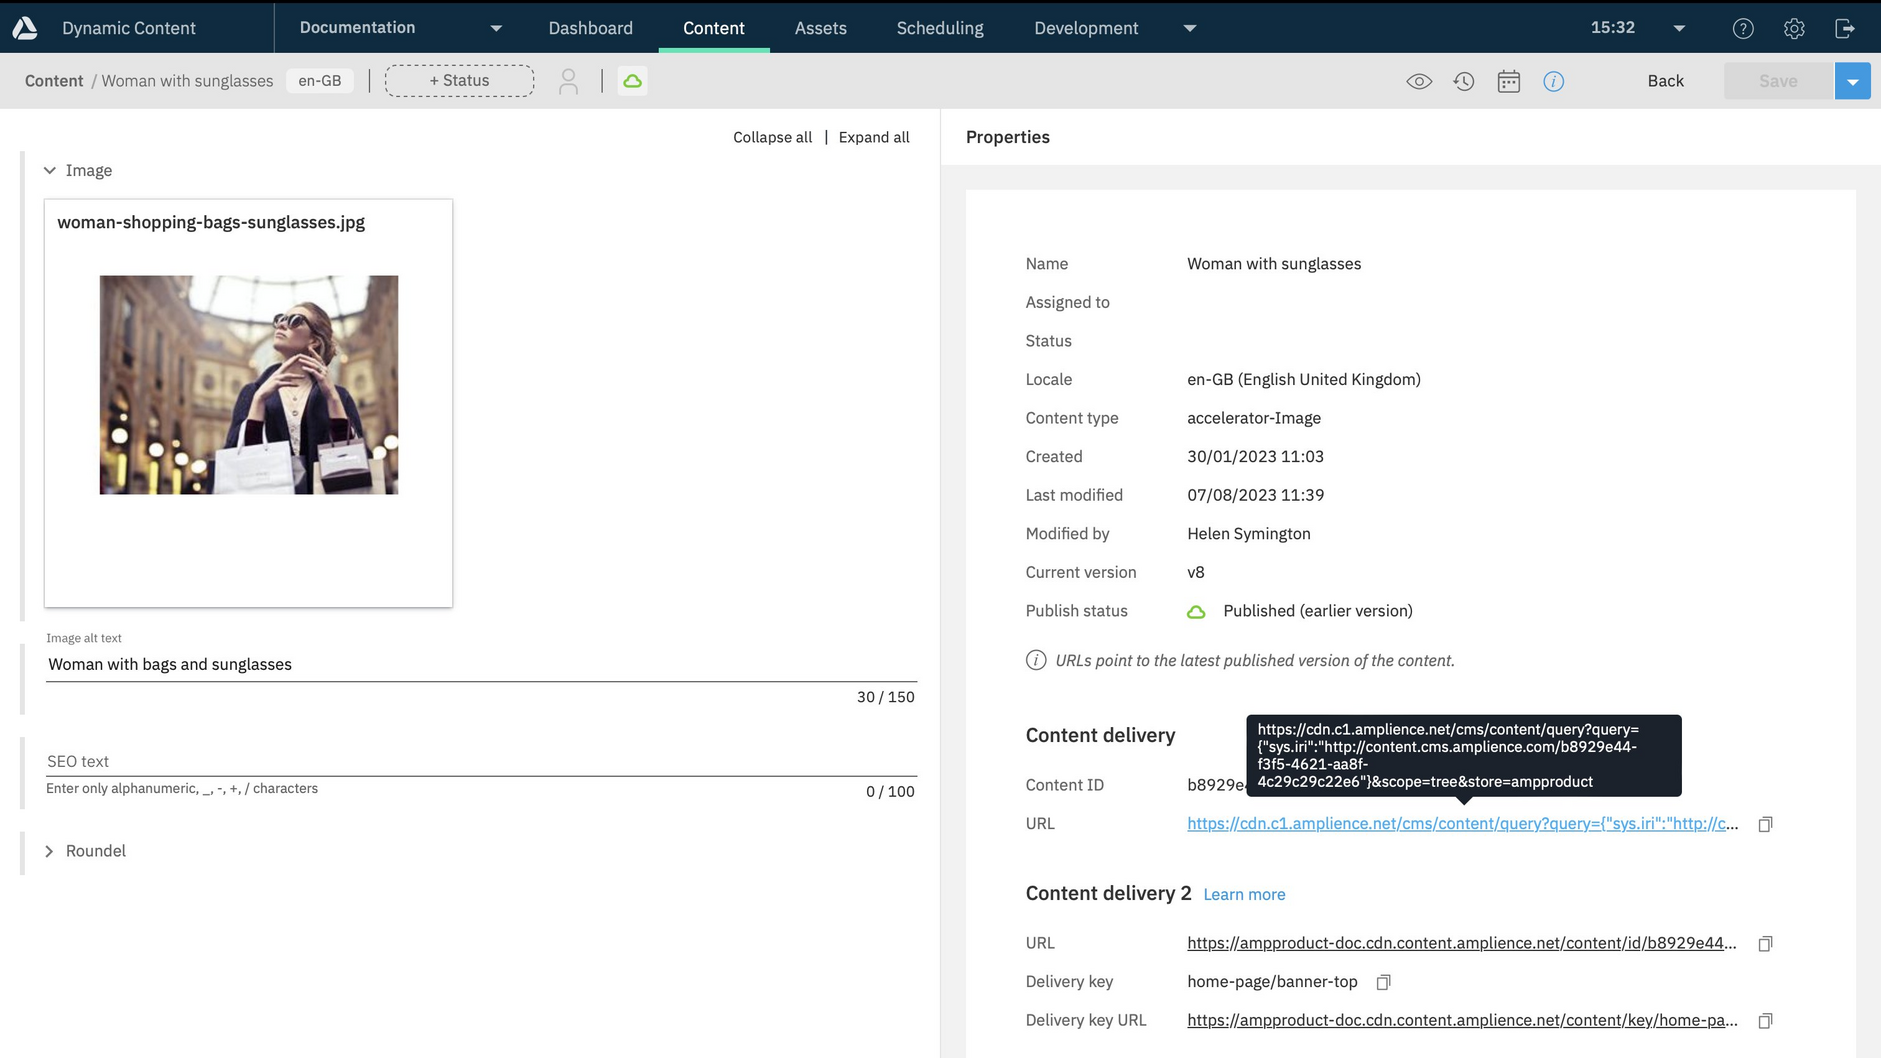
You can find your account name from the content item properties pane in the content form. Copy or hover over the URL in the "Content Delivery" section as shown in the image below. The account (sent in the store parameter) is part of the URL for the original Content Delivery API: in this example it's set to "ampproduct".
The account name is part of the Dynamic URL for images and video in Content Hub. You can also find the account name by clicking on the Content Delivery URL for any published content item containing an image, and copying the image endpoint from the JSON that's returned.
Optional parametersLink copied!
locale: Return content for the specified locale (optional). This is used with field level localized content. Specifyinglocaleis particularly useful when used with Amplience Search. See locale for more details.snapshotId: the exact snapshot to retrieve (optional - only for snapshot payloads).mediaHost: override the hostname used when constructing media URLs (optional). If not supplied, the hostname defaults tocdn.media.amplience.net, or the mediaHost configured for your account). See mediaHost for more details.
MediahostLink copied!
withDeliveryContentItem will return media (such as images and video) with Amplience's default production media domain of cdn.media.amplience.net, rather than a virtual staging domain. This is to ensure that you do not retrieve media from virtual staging domains in your production code. However, your media must be published.
If you do want to index staged media URLs, then include mediaHost="myVseUrl" as an additional parameter, where myVseUrl is replaced with your staging environment. Note that staged media URLs must not be used in Production. This setting can also be used to replace cdn.media.amplience.net if you have a custom media domain.
LocaleLink copied!
If you are using field level localization, then you can retrieve the full localized content for all locales, or filter it by a specific locale using the locale parameter.
Filtering content by locale within your custom payload is particularly useful when used together with Amplience Search. See the Search and localization page for more details.
The following custom payload uses withDeliveryContentItem to retrieve content for the fr-FR locale.
Locale filtering rulesLink copied!
The withDeliveryContentItem helper is just a wrapper around the Content Delivery API and so locale filtering rules work in the same way.
- An exact match such as
locale=fr-FRorlocale=de-DEwill return content for the chosen locale locale=*will return content for the first locale that contains a valuelocale=en-*will return content for the first locale that has "en" as a language code- You can specify multiple locales separated by a comma and these will be evaluated from left to right until a matching locale is found. For example,
locale=fr-BE,en-GBwill first look for content for the fr-BE locale and if none is available will look for content with the en-GB locale.
If a locale cannot be found for a localized property then that property value will be set to null.
For more information about locales, see the localization overview section.
Example- the entire payloadLink copied!
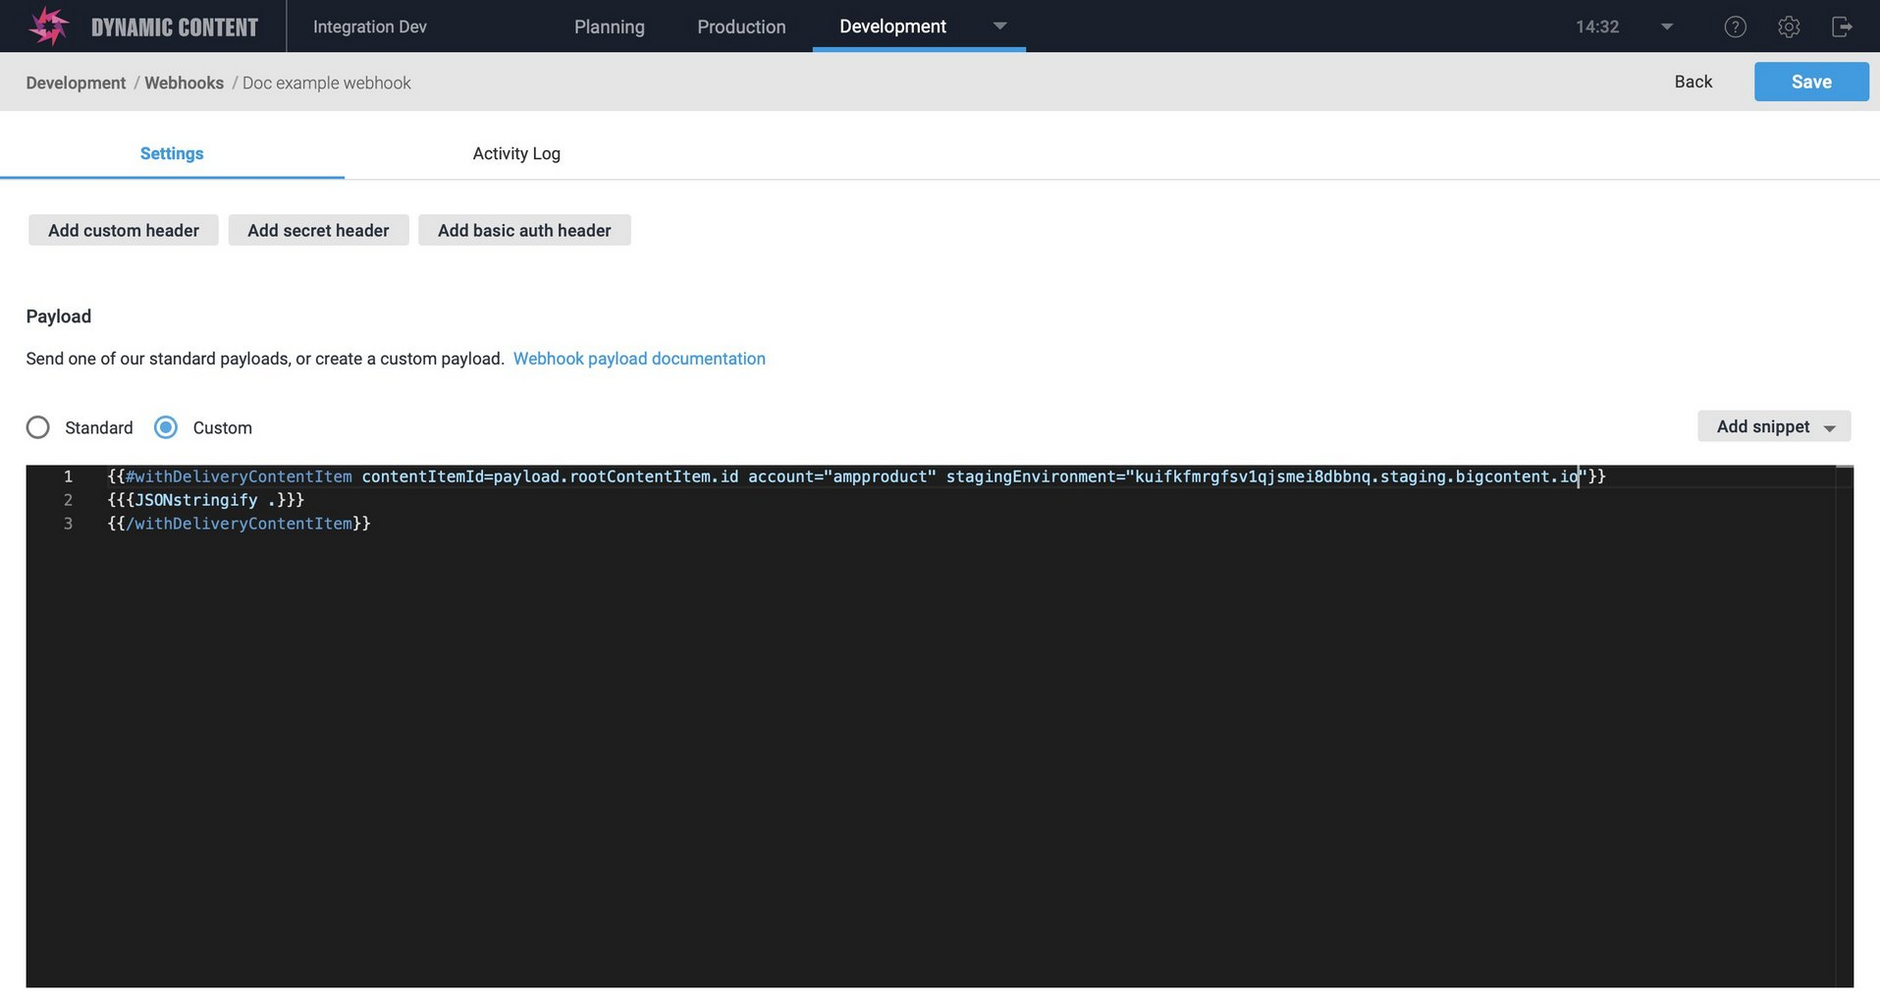
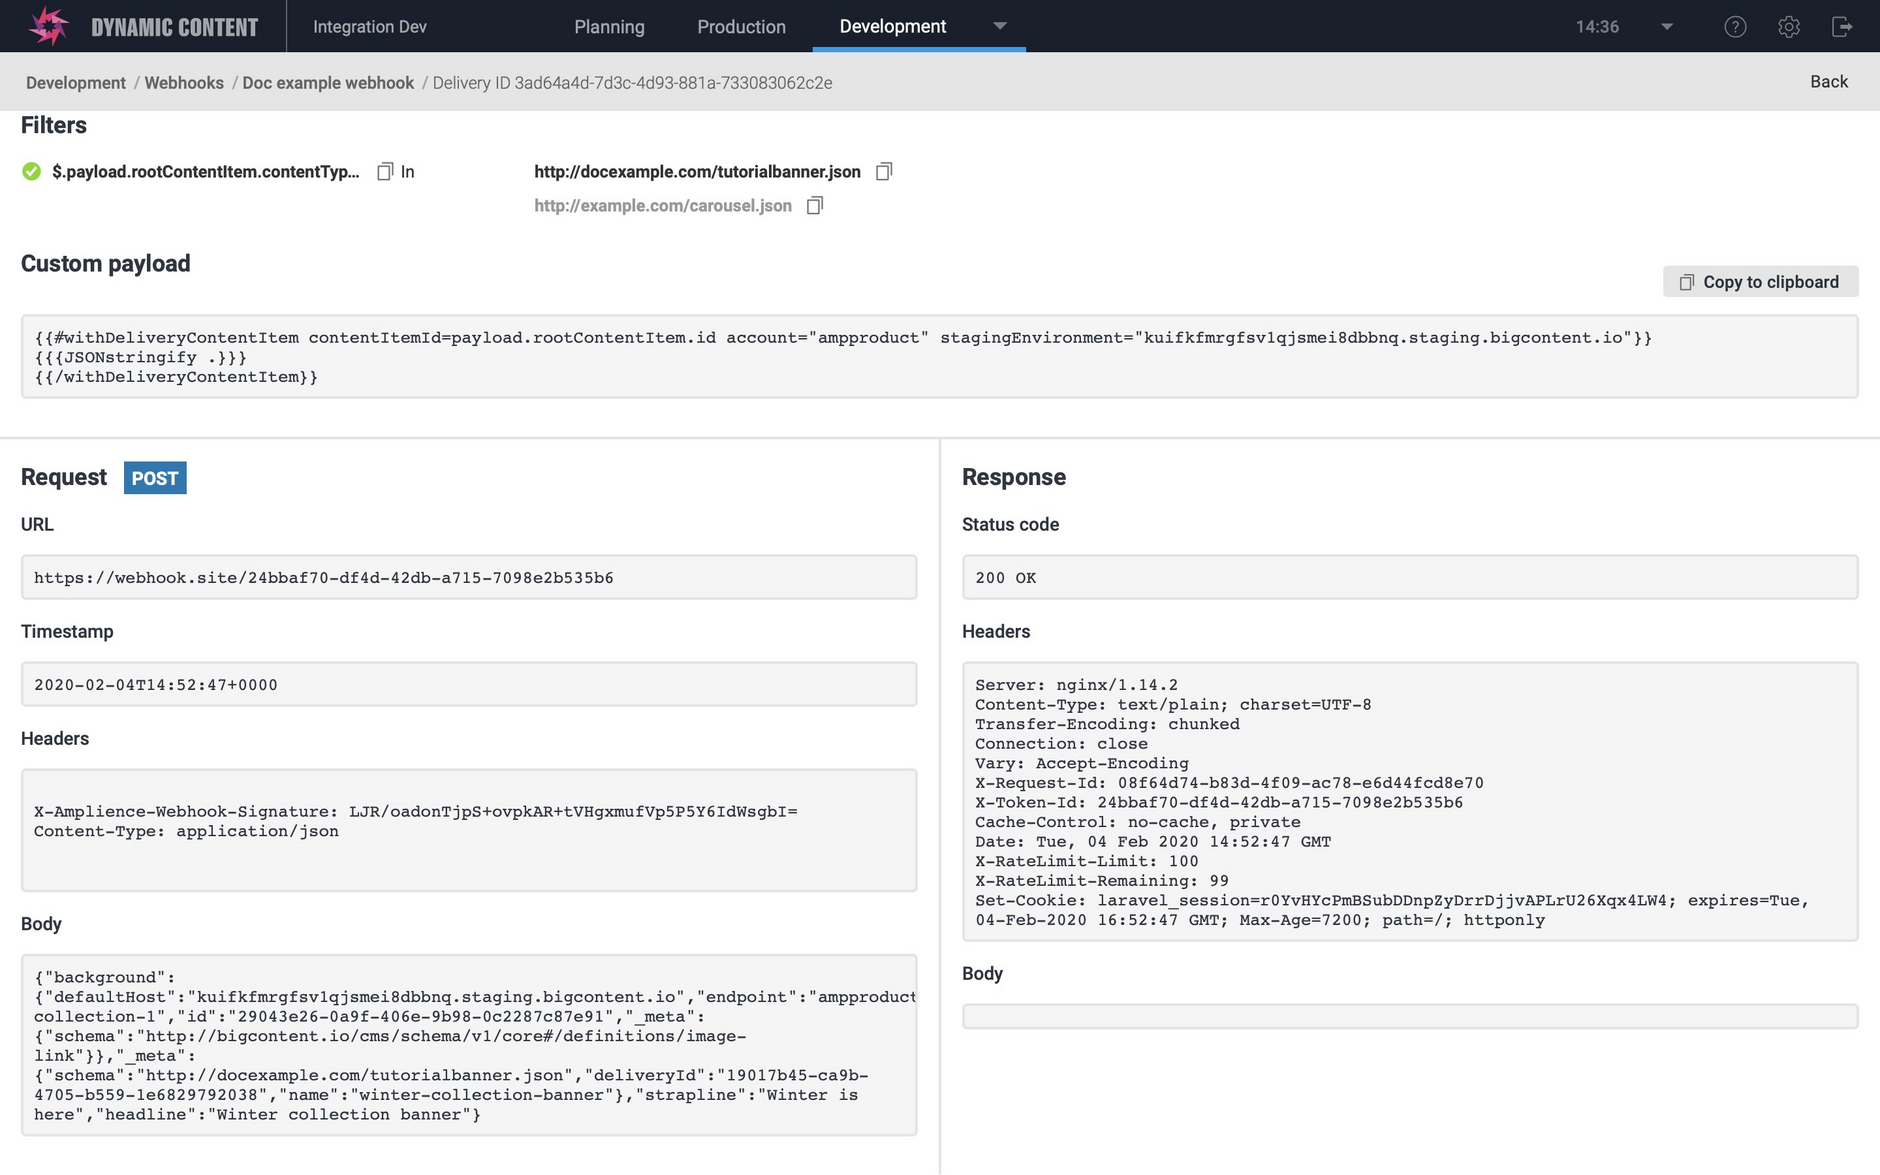
The following example shows how to use JSONstringify to output the entire content item into the custom payload. This is useful during development as a starting point to help you tailor your handlebars.
The following is shown in the webhook details window. The body section of the webhook request contains the entire content item and the custom payload is also shown.
HTTP request methodsLink copied!
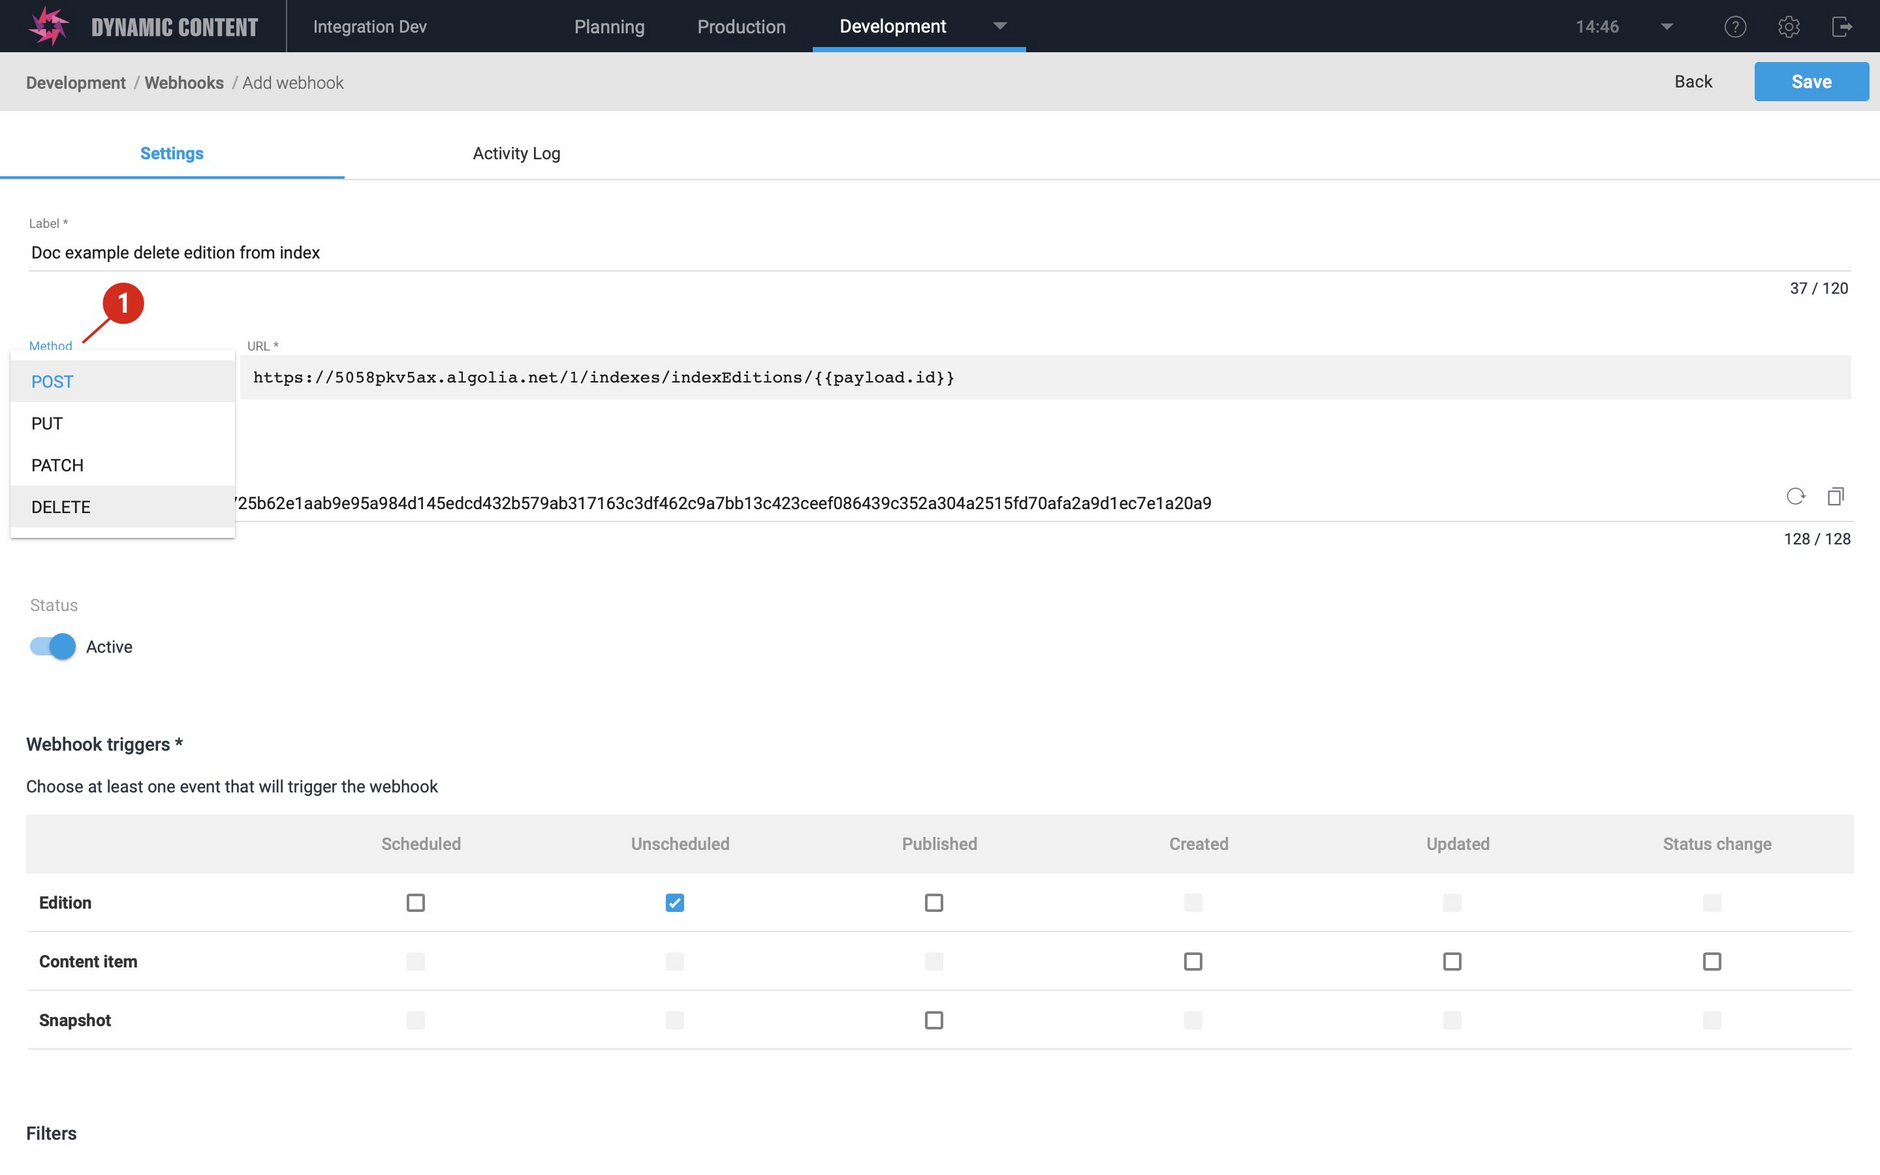
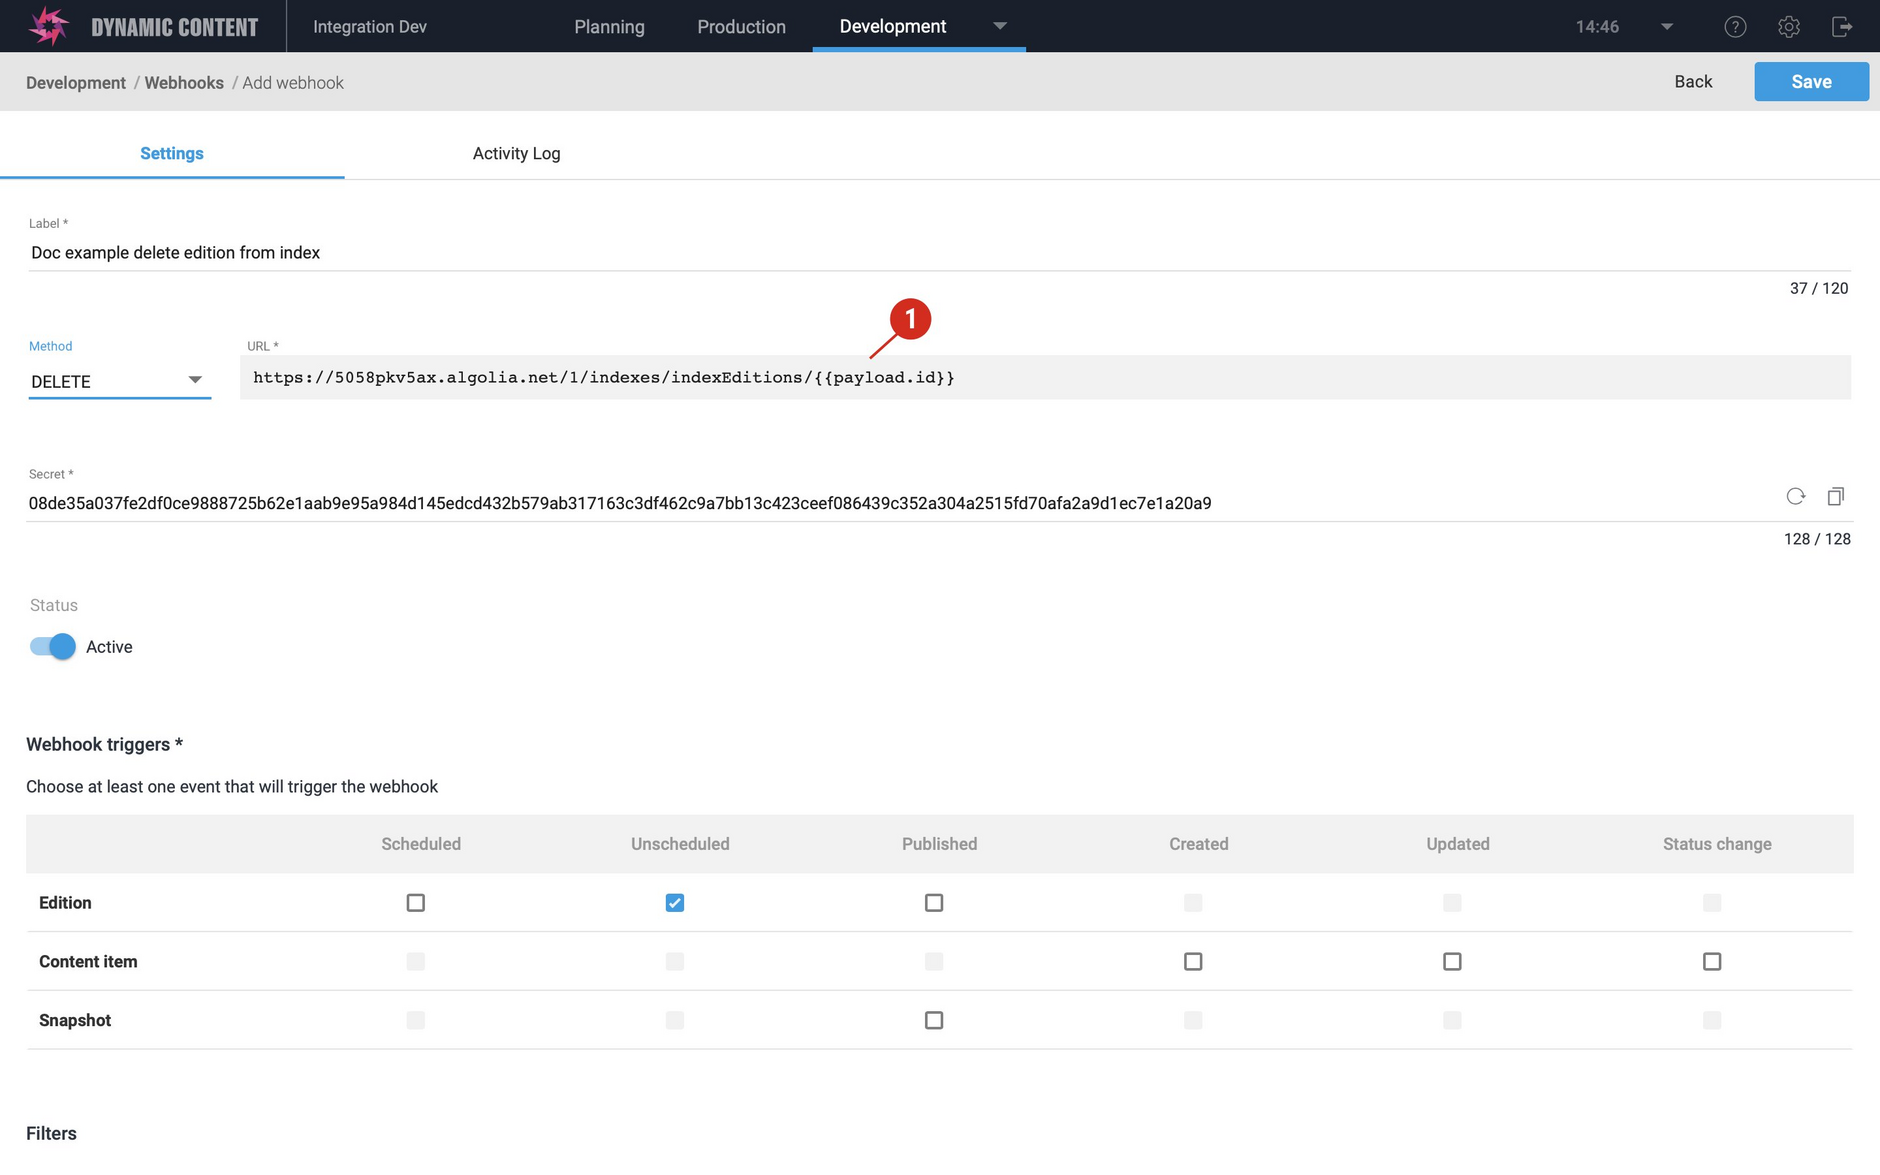
You can choose which HTTP method is used for the webhook request. By default the method is set to POST, but you can also choose PUT, PATCH and DELETE. In the example below, we have an Algolia search index that contains scheduled editions. If an edition is unscheduled, we want to remove it from the index, so we set up "Edition unscheduled" as the webhook trigger and choose "DELETE" as the method.
Templated webhook URLsLink copied!
When sending a PUT, PATCH or DELETE request to an API, you will generally have to identify the object which you want to update or delete. You can add handlebars to your request URL in order to provide the information that the API requires. You can include any values from the standard payload for the webhook event that you're using. In this case we are using payload.id to identify the edition we want to delete.
The URL is specified as follows:
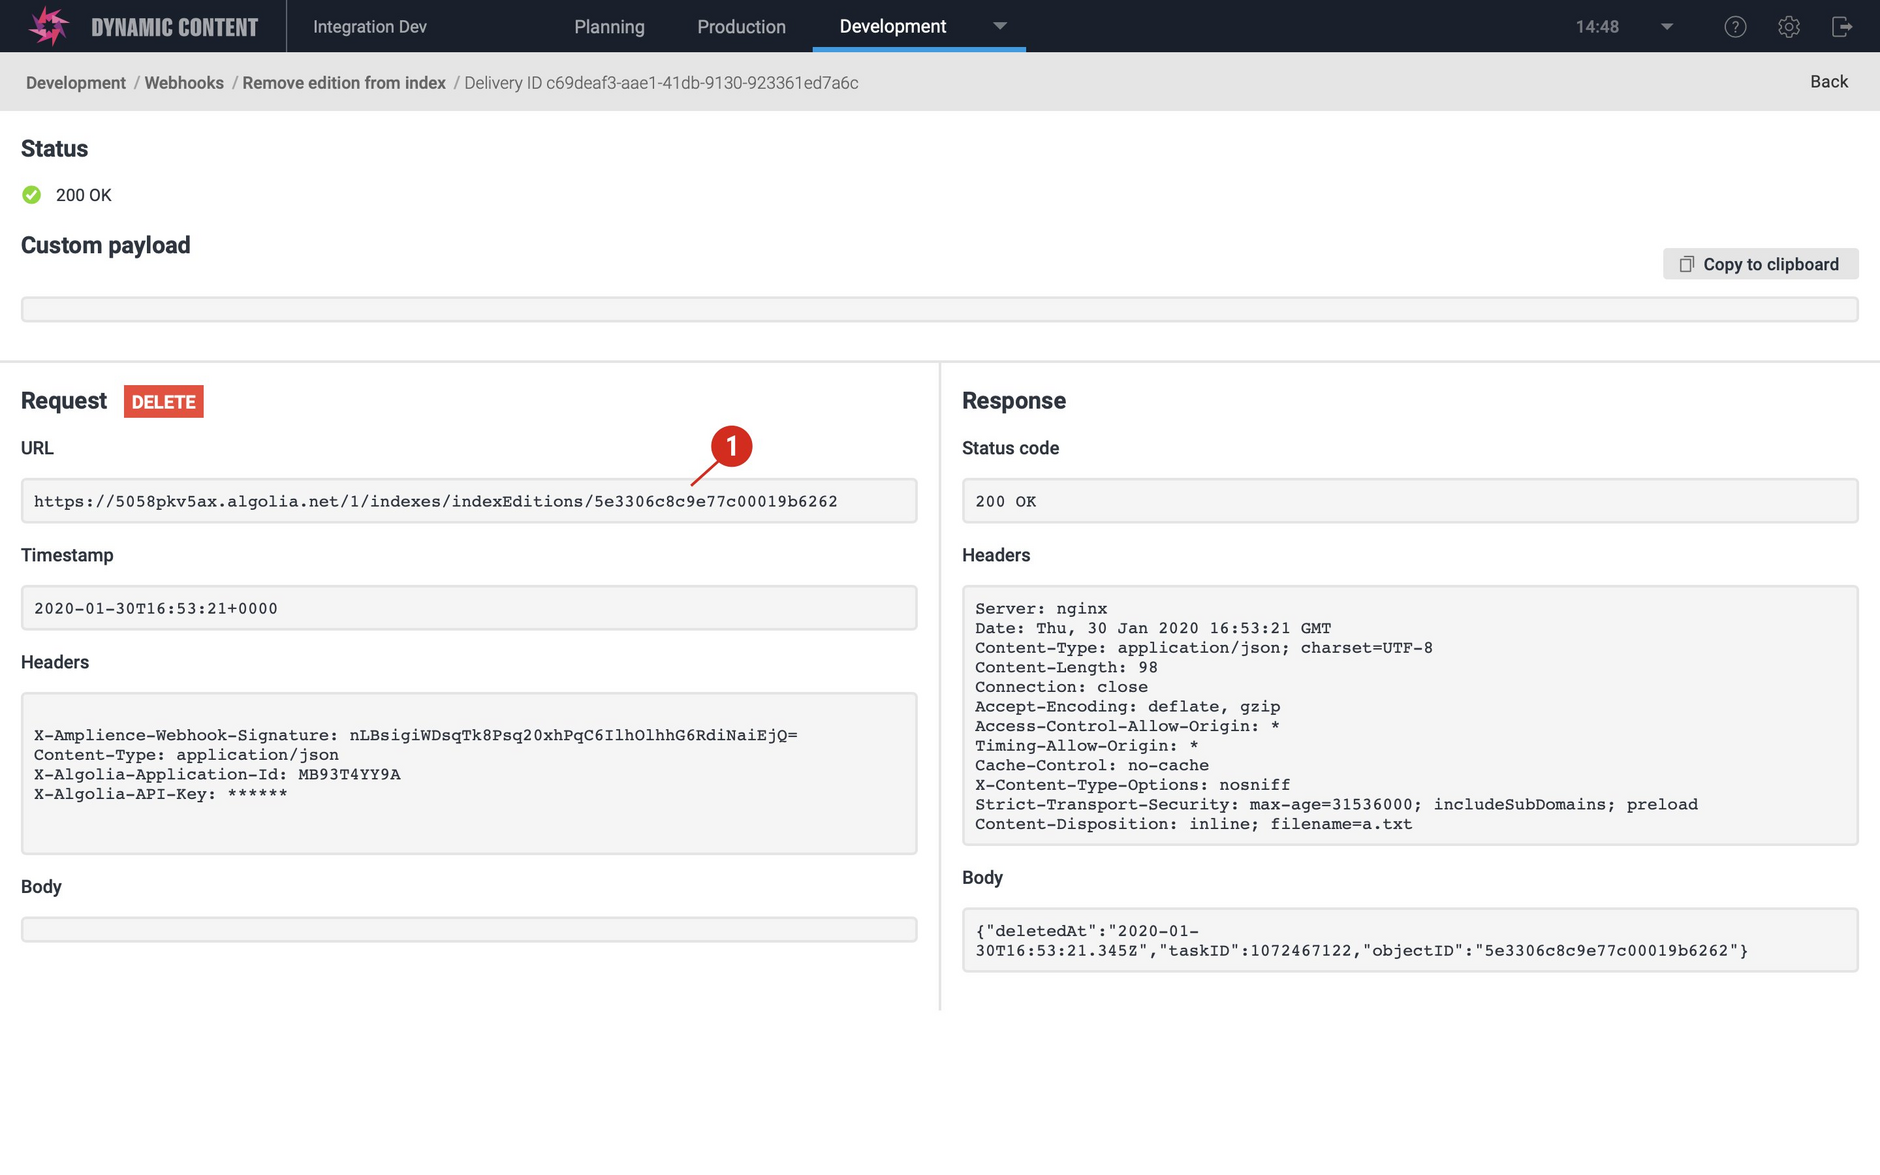
When an edition is unscheduled, the webhook will be triggered and payload.id will be replaced by the id of the edition that was unscheduled. For example:
The image below shows the webhook details when this webhook is invoked. Notice that the webhook URL (1) includes the id of the edition to be deleted. This is retrieved from the specified handlebars when the webhook is invoked.
You can also use any of our supported handlebars helpers in the URL, so you can URL encode values if the API you are integrating with requires it, for example.
Related pagesLink copied!
ExamplesLink copied!
Slack example Part 1- Content created and updated
